Managing Case Actions
ARISg allows you to enter information essential to record an adverse event. Apart from entering the case related data ARISg allows you to perform additional activities on a case. Your ability to access the functions is limited by your permissions. ARISg allows you to perform the following additional tasks on a case
• Versioning
• Tracking differences
• Translating
• Copying,
• Deleting
• Locking/unlocking cases
• Storing documents.
Introduction to AER
When an adverse event occurs to an individual due to a drug, vaccine, medical device or other medical products, an Adverse Event Report (AER) is submitted to the regulatory authorities. An AER can be reported from many sources including the patient, doctor, investigator (from clinical trials) or the manufacturing company.
ARISg helps you store and maintain the data related to an AER and submit regulatory reports to the appropriate authorities.
ARISg employs a case-centric approach to data entry. That is, the data entered for an Adverse Experience is entered as an AER. The AER associates the data entered to its related case.
This methodology enables ARISg to provide numerous unique features for case entry and tracking.
Numbering AER Automatically
Each AER is identified by a unique number called AER Number that is printed on all regulatory reports. This AER number is used to identify the AE cases. Since AERs (Adverse Event Reports) are shared across different sites, user must use a numbering scheme for the AERs that uniquely identify them. Every company unit can use unique numbering scheme .
All cases in ARISg can have their AER number automatically generated during data entry. This number can be fully defined by a company to follow their internal numbering method. Since an AER number is 18 characters long, a company can use any combination of dates, sequence numbers, case data and separator characters (such as '-’) to generate that number.
In addition, if a company’s internal policy is to assign different AER Numbers for different health authorities, countries or internal business units, ARISg can accurately maintain control of the tracking of cases under different identifications.
Note: Automatic numbering is enabled only if it is specified in the Installation Parameters in ARISg Administrator.
Underlining and Formatting Text
At different stages of case processing, such as data entry, assessment and reporting, the user enters description in the text fields. For Example a data entry operator enters text in the Event description field of Case Registration section. You can format the text entered in these fields by using control characters into the desired format while printing.
Formatting can be used to position text on reports and/or to place emphasis on certain words and phrases.
The following formatting options are supported:
Underline
Add spaces
Insert carriage return
You can format any text by typing certain control characters before and after the text that you want formatted. The system automatically converts these control characters into the desired formatting while printing.
To underline any text:
Insert certain control characters before and after the text that is to be underlined.
The system automatically converts these control characters to underline while printing.
Note To underline, the control characters are '^U1.’, and '^U2.’
For example:
Format |
^U1. Text ^U2. |
Before the text, type '^U1.’ and after the text, type '^U2.’ (^ is called a 'Caret’, on a typical keyboard, it is entered as shift/6.)
For example: to underline 'great’ in the sentence 'This is great’, you must type 'This is ^U1.great^U2.’ in the text edit field.
Spaces: To define spaces, the control character is ' ^#n’, where # represents the number of blank spaces you want to insert.
Format |
^#n |
For example: To insert 10 blank spaces before the sentence 'This is superb’, you must type '^10n This is superb’.
Carriage Return: To insert a carriage return (Enter/Return key ¿), enter '\’ at the position where you want carriage return to appear in the report.
Format |
\ |
For example: To insert carriage return after each sentence in the paragraph 'This is great. This is really great. This is superb. This is really superb.’, you must type 'This is great. \ This is really great. \ This is superb. \ This is really superb. \’.
The output will be as shown below:
|
Setting the Language
ARISg is an international adverse event-reporting product. You can generate and track regulatory reports for authorities in different countries. Although English is the standard international language, some authorities require reports in their native language. To address this requirement, ARISg provides multi-lingual support, through which the data can be translated into the preferred language.
Language support within ARISg is accomplished on two levels:
Standard Data
Free Text Data
Mapping Standard Data
For data that is mapped to ART dictionaries and codelists, data can automatically be converted to any language. ARISg automatically converts the data in these areas into the required language. This can be done for both data entry and report generation.
During data entry, this can be accomplished at 'run-time’ (by setting the Tools >options > Preference>Language), which means the language translation can occur while the case is being entered, allowing for instant translations of many key data items within the case.
Your codelists and dictionaries must contain the related records for the required language. This is done in the ARISg Administrator module.
Mapping Free Text Data
For free text data, such as the Event Description, ARISg employs 'text-shadowing’. Text shadowing allows you to read or write in one language, then write in another language. This allows a qualified user to translate the text from one language to another. ARISg maintains multiple languages on the database.
Performing Spell Check
ARISg provides the facility to spell check the contents of the text fields in English. The Spell Checker supports the following functionality:
It highlights the words that are not in the dictionary.
It provides a list of closely related words that can be replaced for a wrong spelling.
It provides a user dictionary for the language supported, to which words not in the dictionary can be added.
Note: Currently, the American English Dictionary is supported by the application.
Field Description of Spell check page
To Start spell check of a word or text entered in the field :
Select Edit > Spell Check from the main menu.
Start the spell check option by pressing the short-cut key (F7). Alternatively, click the Spell Check icon provided in the Tool bar to enable the spell check option.
Note: The cursor in a text field and current mode is edit mode, spell check can be activated.
Identifying special characters in the text fields
ARISg provides an option to search and highlight the invalid characters in case Narratives, E2B fields and other text fields. The regulatory authority like PMDA and FDA does not accept the reports with these invalid characters, hence, it is essential to identify such invalid characters while entering the information in E2B fields or providing description in the case narratives.
If the case contains any invalid characters, the application displays the validation messages.
After entering the data for case Narratives or E2B fields, using the hot key [CTRL+F5] or Validate Chars option in the Records menu, you can find and delete the invalid characters before you continue with saving the case, distribution, or report generation.
Some example of invalid characters include: €, ÿ, ƒ, ”r;r;, …, †, ‡ etc.
To identify the invalid characters in the case narratives description or in the E2B field, perform the following:
Enter the description in the case Narratives text area.
Or
Enter information in an E2B field.
For example: Product description (B.4.k.2.1) in the Full Data Entry > Product tab.
Place the cursor in the field where you want to search for invalid characters.
From the Record menu, click Validate Chars.
Or
Press [CTRL+F5].
The application displays the Validate Text dialog box.
The Validate Text dialog box contains the content entered in the description or the E2B field you are validating for invalid characters. The application highlights such characters to indicate as invalid characters. as shown in the following figure:
Delete the highlighted invalid characters.
Click OK.
The invalid characters are deleted from the description or the E2B fields.
Interfacing MS Office
ARISg supports MS Office for those functions, which uses MS Office interface.
The features are:
Standard Letter generation
Comparison report
Reporting Times Lines
Using MS-Word
ARISg supports MS Word only for those functions that use MS Word interface.
MS-Word is used to generate standard letters. These standard letters are based on the templates set in the Administrator module. These letters contain information about the case.
Generating Auto-Narrative
ARISg supports the generation of auto-narratives or standard statements. Statements help in efficient and accurate entry of details into an AER. Often, many companies prepare standard text when assessing Adverse Event Information. Processing requires several standard statements to be typed as part of the text (company remarks, reaction details etc.).
Note: Selection of statements is available only for multilingual texts.
Since the statements are standard statements, in place of typing them every time, ARISg provides a lookup during data entry and allows you to select the term.
Make sure to save the AER before you insert the Standard Statement in the narratives field. Else, the following message appears: Save at least once before invoking Auto Narratives
ARISg facilitates this along with the ability to insert the information into the case in a standard text.
Editing the AER
Click Edit > Auto narrative from the main menu to display the Auto narrative Lookup containing all the Auto narrative names in a list box. The application displays the Statement titles in alphabetical order.
Select the appropriate statement corresponding to the auto narrative and insert into current text field at the cursor position.
On the text field, press F8 to access Auto narrative lookup.
Field Description of Auto Narrative Lookup
Enter the relevant text in the narrative field
Note: If you attempt to close the case without saving it, ARISg prompts you to save the same in the following page and the message displayed,"Do you wish to complete the Activity for this AER before closing it?"
Click the Yes button to save the changes.
Listing and Navigating a Record
To select and navigate to a particular record:
Click List button in the Reaction page. The reaction list page appears.
The Reaction List page displays the following details:
- Reported term
- Onset date
- Cessation date
- Seriousness
- Outcome
Click List button in the Product page. The Product List page appears.
The Product List page displays the following details:
Product description
WHO DD
Pref. product description
Internal Drug Code
Mfr. Name
Click List button in the Disease page. The Disease List page appears with that displays diseases related records.
The Disease List page displays the following details:
- Disease Type
- Disease Term
- ICD Code
- ICD Decode
Click List button in the Device page. The Device List page appears with Device related records.
The Device List page displays the following details:
- Device Type
- Brand Name
- Manufacturer name
Designing Data Entry Form Screen
In the ARISg application, the Data Entry Forms are designed according to the standard format and workflow for capturing the case information. The screen designing feature helps you to customize these standard data entry forms to suit your case information workflow plan and requirement.
In the design mode enables you to customize the data entry page for the following:
- Rename the name of the data entry panel.
- Add a new panel (section) to a data entry form.
- Add a new tabs to the panel.
For example, the Patient tab in the Full Data Entry screen is designed to capture only the details of the patient who is subjected to the adverse reaction. For the purpose of quick reference on the same Patient tab, if you intend to add brief detail of the Reporter such as Name, Designation and Location, then using the Design Mode you can add the new panel naming as Reporter and also add relevant tabs to that new panel.
The Design Mode option is available on the Full Data Entry page only when the Add/Update/Delete and Browse check boxes of the Screen Designer option are selected in the Admin > Security > Roles & Privileges Maintenance > Privileges > Setup page.
The Design Mode option is available as a collapsible section that is displayed below the toolbars panel of the Full Data Entry screen. Use the drop-down arrow under the toolbar panel to show and hide the Design Mode button.
On clicking the Design Mode button, the page switches to design mode of that data entry page and the following options are displayed in the design mode collapsible section.
Normal Mode – To switch to normal view of the full data entry page.
Add Panel – To add new panel/section to the data entry form page.
Add tab – To add a new tab to the new or existing panel/section of the full data entry page.
Save – To save the new design changes of the full data entry form page.
Edit icon (
 )
– In the design mode, this icon is displayed adjacent to each
panel names in the full data entry page. This icon indicates the
panel or label is editable.
)
– In the design mode, this icon is displayed adjacent to each
panel names in the full data entry page. This icon indicates the
panel or label is editable.
You can rename or create a new name of the panel based on the log on language of ARISg application. Change or Add the name of the panel is displayed based on the ARISg login language selection.
Designing a Panel
A panel in a data entry form page consist a group of fields that are logically related to a particular information of an AER. Generally, ARISg offers standard set of panels in each data entry form page in compliance to the standard workflow. To add a new panel, ensure that the workflow process of your company demands an additional panel comprising additional information of an AER and also relative to the standard data entry form.
Designing a Tab
A Tab can have multiple panels that are classified based on logical anomaly of the different group of fields. Each tab contains specific group panel(s) based on the relevancy of the AER information.
Designing Patient Data Entry Form Screen
In this section, let us consider an example of creating Inpatient and Out Patient tabs containing respective distinct information under different panels.
To design the Patient data entry screen.
Login to ARISg.
Create a new AER or open a case from the Workflow.
From the Forms menu, click General.
The Full Data Entry Form page appears.
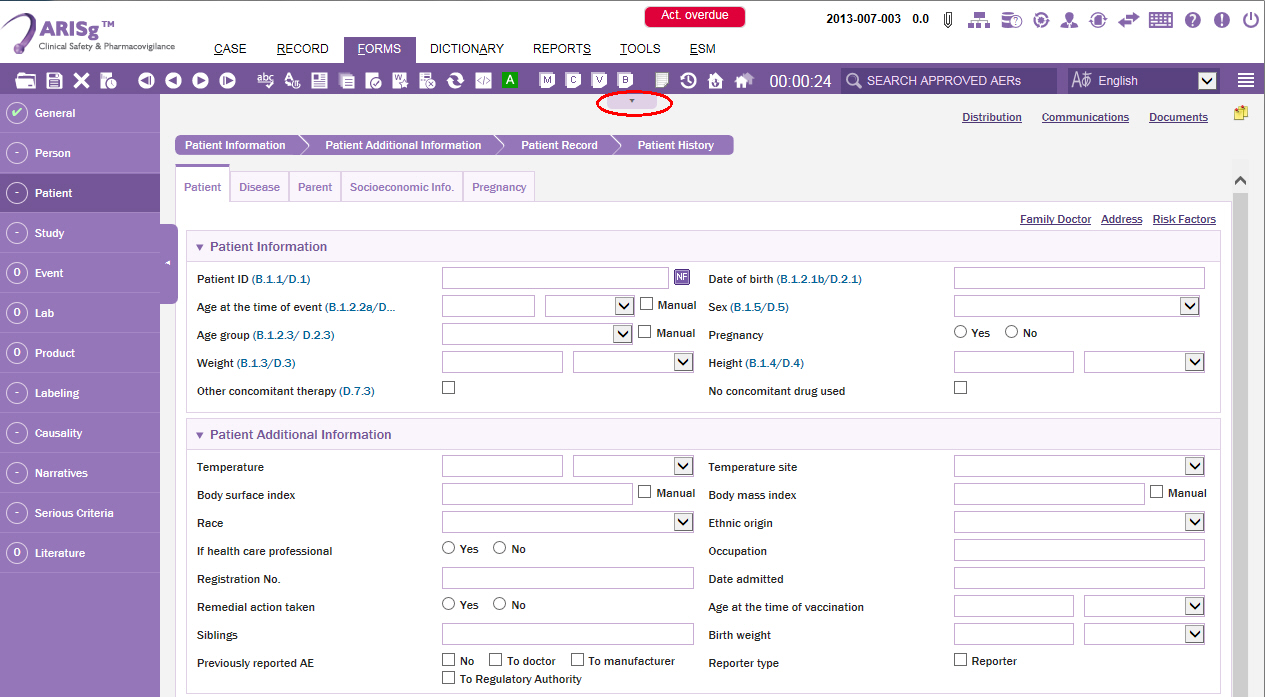
Click the Patient menu.
The Patient data entry page is displayed.Click the down-arrow button under the toolbars menus.
The section expands displaying the Design Mode button option.

Click the Design Mode button.
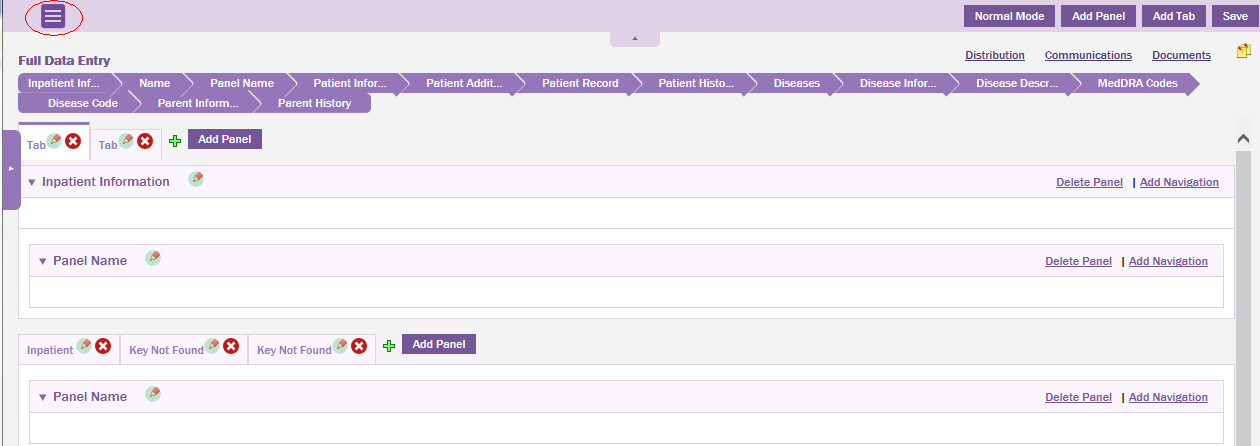
The Patient data entry page is switched to edit mode.On the upper-right corner of the screen, click Add Tab button.
A new tab with the default tab name as Tab Name is added at the top of the page.

Click the edit icon (
) adjacent to the Tab Name to
change the name of the tab.
The tab name edit dialog box appears.

Type the name of the tab as Inpatient.

If you want a different name for the tab when you logon to ARISg in other login language, then perform the following:
Click Add to add a new row to set the name of the tab in different language.
Type the name of the tab as XYZ.
From the language drop-down list, select Japanese.
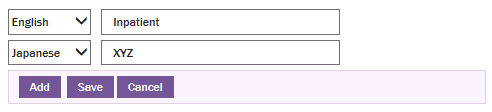
Click Save. This setting displays the Tab Name as XYZ when a user logon to ARISj.
Tips:
To add additional tabs click ![]() icon.
icon.
Tips: To add a new panel click the Add Panel button to add a new panel at the top of the page. To append a panel to a tab, drag and drop the required panel to a tab.
Click the edit icon (
) adjacent to the Panel
Name to change the name of the panel.Type the name of the tab as Inpatient Information.
A new tab with the default tab name as Panel Name is added in the Inpatient tab.Click Save to save the tab name. The Saved Successfully message appears.
Click OK to acknowledge and close the message window.

Click Normal Mode to switch to normal mode of the data entry form.
In the Patient page you can view the newly added Inpatient Tab with the Inpatient Information panel.
Adding Fields in the Patient Data Entry Form Screen
In the data entry pages, you can add the fields that are logically relevant to the respective data entry page or tab you are creating. The Data entry page is generally build for capturing certain information related to the adverse event, hence, the tabs and fields that are being designed for the data entry page must be logically relevant. The fields that are used for adding in the data entry page are derived from the Forms Library. In Admin, the forms library is maintained, where each form is designed to contain a group of fields that are logically relative to a specific information of an adverse event. A Form is identified by unique ID and name. For designing the data entry page, drag-and-drop the fields associated to the Form ID from the Form Library pane to the data entry page.
To design fields in the data entry page.
In this section, let us consider an example of creating fields in the Patient data entry page.
Open a case.
On the Forms menu, click General.
The General data entry page appears.
Click Patient from the menu to open the Patient data entry page.
Switch the data entry page to design mode.
Click the
 icon on the upper-left corner of the
page.
icon on the upper-left corner of the
page.
Tip: Click ![]() to close the Form Library pane.
to close the Form Library pane.
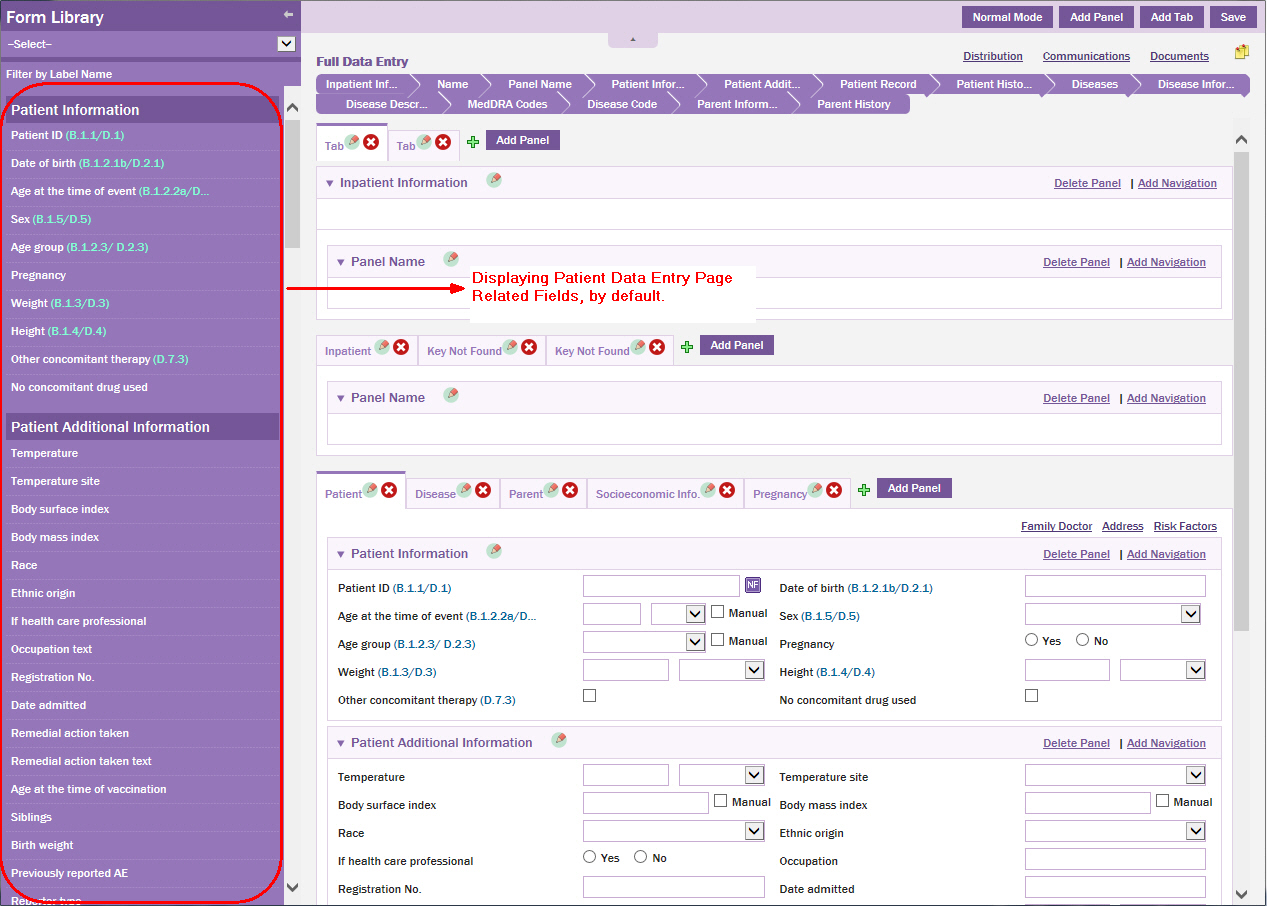
The Form Library pane is displayed.
NOTE: By default, the group of fields relevant to the Patient data entry page, that is, the page you are designing are displayed in the Form Library pane.
From the drop-down list, select the Form ID that is logically related to the patient data entry page, that is, select Cosmetic Patient (1481) Form ID.
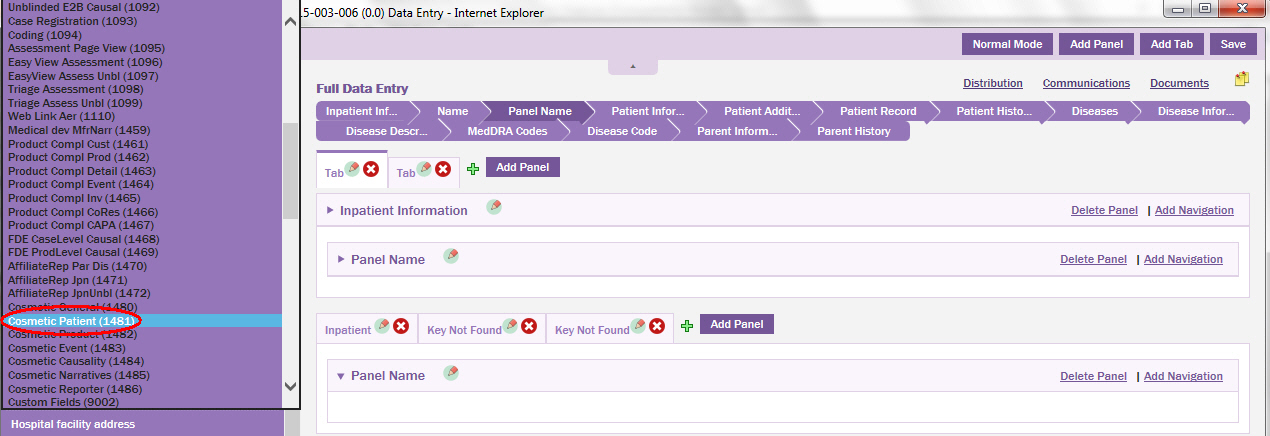
The group of fields associated to the Cosmetic Patient (1481) are displayed.

Hover the mouse pointer on the field you want to move to the data entry page.
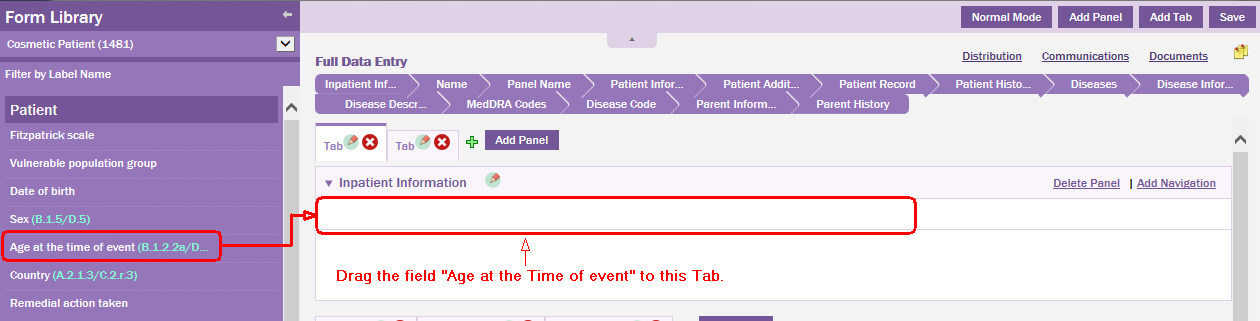
Drag the field to the desired location on the data entry page.
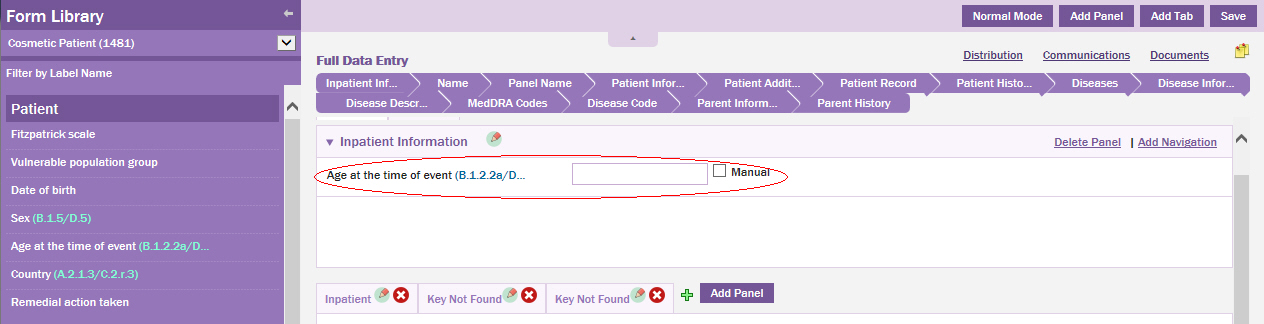
Click Save.
[Optional] On the Data Entry page while in the Design Mode, click on the field you want to delete, the field background color changes and delete icon appears at the end of the field label. Click the delete icon to delete/remove the field from the data entry page.
A message appears stating a confirmation message to continue deleting the field.
Click Yes to delete the field from the data entry page.

Click Normal Mode to change the data entry page from design mode to normal view.
The field is successfully added and displayed in the Patient data entry page.
Ranking the Terms
To rank the terms in the records:
Click the Rank button in the Disease, Product, Medical Devices, Vaccines and Reaction page. The terms are displayed in the data entry order in the reordering screen.
To re-order the records
Click on the upward or downward arrows in the reordering page.
For example: if you enter 2 or more terms (reported terms) in the All Reactions page.
Click on the
 button,
the following Reordering page appears. The terms are displayed
in the order they are entered.
button,
the following Reordering page appears. The terms are displayed
in the order they are entered.
To change the order, click the upward or downward arrows
Click OK. The records are ranked in the specified order.
Ranking for Blinded and Unblinded Suspect Products
Ranking for Blinded Products
In the blinded screen enter the details and click
.
The Blinded Reordering page appears.
Note: Both the blinded and normal products in the above "Reordering screen” appears.
Click the arrows keys to rank the products in the order you specify.
Ranking for UnBlinded Products
In the blinded screen enter the details and click on the Rank. The Unblind Reordering page appears.
Note: The blinded product tradenames corresponding to the unblinded product tradenames listed in the above "Unblind Reordering screen” appears.
Click the arrows keys to rank the products in the order you specify.
Note When the Code is "Broken” at the Study level in Admin, then all the unblinded records are displayed in the All Products screen.
Click the RANK button in the All Products screen, to display the Unblinded Rank screen as shown below. The Rank screen displays the Unblinded Records along with the Blinded record description. You can also view all the Normal records in this screen.
Note: The Unblinded and Normal records can be re-ranked.
Note: When the user changes the rank of a normal product (that is neither blinded nor unblinded) in the unblinded ranking screen, then this change in rank does not reflect in the corresponding blinded(ranking) screen. The change is displayed only in the unblinded reports.
Alternatively, when the user changes the rank of an unblinded product in the unblinded ranking screen, then this change in rank does not reflect in the corresponding blinded(ranking) screen.
However, the rank change of unblinded products corresponding to a blinded product does not impact the unblinded ranking screen.
Save the case if you manually change the rank in the unblinding screen for the newly created records.
Linking Blinded and Unblinded Products
You can view the link between blinded and unblinded products from the Blinding/Unblinding mapping screen.
Viewing the link for a blinded product
Enter the name of the corresponding unblinded product.
Click the Mapping button available in the unblinded suspect product screen. This displays the Blinding/Unblinding mapping screen as shown in the screenshot below.
Note: From the below screen, you can view the name of the unblinded product for the entered blinded product.
For more information on the mapping of blinding/unblinding products, refer the Data Entry Process guide.
Note: The Mapping button is available in the unblinded screen when the study has not been broken for study case. The Mapping button is also available in the normal screen when the study has been broken for study case.
Classifying AER Variables
Essentially, these variables facilitate case management in a global environment where several company-operating units are required to report the same AER (case).
An AER comprises of the following variables:
Core data is information that is identical in structure and content throughout.
Global variables are identical in structure but contain data that can be added by various Company Units.
Regional variables are variables added by the regional units.
Local data is information that exists only at the local site and can therefore vary in structure and content.
The corporate variable is a special variable that is similar to a core variable i.e. the information is identical in structure and content everywhere. However, only users associated with the corporate unit can add information or the data that is associated with the corporate variable.
Core Variables
The owner (source) unit of the AER owns the core variables. All the units receive Core variables. All variables are treated as core variables unless they fall in the definition of Regional, Corporate, Global or Local variables.
Custom fields are also treated as core variables by default.
Corporate Variables
Corporate variables are variables added by the central unit only i.e. medical assessments. Only those users who belong to the corporate unit of the company can add corporate variables.
Regional Variables
Regional variables are variables added by the regional units, e.g., medical evaluation etc. Users belonging to a Regional unit can add regional variables.
Some fields in ARISg can be marked as 'Regional’. Users of the marked units can enter data for the respective fields. Ownership of the regional variables lies with the regional unit that entered the regional data first.
Global Variables
More than one company unit can enter global data. Logically, this data allows entry of either country or company specific information.
The following data in ARISg falls in this category:
AER at Units
Approval information
Labeling information
Communication with health authorities
AER Source
Causality
By default, ARISg treats all the above information as global Variable.
Global data added by the source unit is considered as core data i.e. the source unit does not enter global variables. Any unit can add data to global variables.
Migrating Data from Non UTF to UTF
The data types of fields in ARISg have been changed to CLOB wherein the data is more than 1000 characters. For more details on CLOB refer the guides ARISDB and Customization.
Local Variables
This information is entered at various company units for local requirements, and does not require any transmission to other units. You can define any variable as a local variable.
Standard fields as well as custom fields can be marked as local. If a standard field is marked as local, then it must be marked as local at all company units.
Using ARISg Codelists
ARISg has various features that enforce company standards for data entry. It also contains many features that minimize data-entry time. ARISg Codelists achieves both through an easy user interface.
The Codelists are a set of choices hard-coded by the company for a particular data field. You are obliged to choose from the same list and adhere to the company standards. Select the most appropriate choice for instantaneous data entry.
Note: Codes which are set to 'disabled for data entry' can still be used without error when entering directly into the text field. Codes that are disabled are not shown in drop-down lists but are grayed out. When you select a code that is disabled for data entry, the system restores the old value.
When you open a case where a field is set with a disabled code, this code is grayed out. If you change the code to a non-disabled code, then you cannot change it back to the disabled code.
Using Wild Cards
A Wild Card is a character that can be used in a query to select a range of records. Wild Cards are useful in many situations. A Wild Card is used to retrieve all cases matching certain criteria, such as an AER number starting with the Letter M or 2001. The Wild Card character supported in ARISg is the % (Percentage) symbol. A Wild Card search is done by inserting a % symbol anywhere in the 'string' or the series of characters you enter as search criteria. For example, type a % symbol before, after, or on both sides of known characters of the value for which you are searching. The % Wild Card character can be used in combination with letters and numbers while entering the criteria for retrieving cases (For example: M%, ATOR% or %2001%00).
Retrieving Records by Lookup
You can retrieve desired record(s) by using a Lookupicon. This facility is provided in pages that maintain multiple records.
Click the Lookup
 icon.
The corresponding detail Lookup screen appears page appears.
icon.
The corresponding detail Lookup screen appears page appears.Enter the criteria to select the required record(s). You can use percent sign (%) as a wild card character in searches.
Auto suggestion feature in Lookup
The Auto Suggest feature in the Lookup field enables you to search the code and decode value.
You can use Auto Suggest feature for the following advantages:
No need to remember codes in order to search for, or enter, data in a field. You just type the decode value for the fields having code and decode values.
Auto Suggest can search for data in multiple lookups and will return all records that match the specified word.
Auto Suggest is faster, more efficient, and requires fewer mouse clicks.
In ARISg, when you type the first two letters of the decode value in the Lookup fields, the application displays the suggestions that match with the words as a drop-down for that field. This enables you to stop typing an entire word, and instead, select the required value from the list that displays.
After you select the value from the drop-down list in the field, before displaying the actual decode value, the application temporarily displays all the fields separated by a comma delimiter available in the respective Lookup. On selecting the required value from drop-down list, the associated field gets displayed with the selected value. The Auto Suggest feature in the application is same as selecting a record by invoking Lookup.
Searching Components on dictionaries and libraries
In ARISg, you can perform a search on dictionaries and libraries. The lookup function is provided to automate and expedite the data-entry process. The fields supporting lookups have a lookup icon, which is a hyperlink to a Lookup page.
Click the Lookup icon. A sample lookup page (ART Dictionary lookup) appears.
To select from a Lookup, enter the selection criteria in the search area (you can enter a % (Percentage) symbol as a wild card character in text fields)
Click the OK button. The records are displayed in the list box. If there are no records matching the defined criteria then the message "No records found” is displayed.
Select the desired record from the list of displayed records.
To enter the selection in the Lookup field, highlight it and then click the Select button.
Field Description of the Lookup
The selected records are displayed in the list box.
Click Select to copy the selected (highlighted) record to the field from where this lookup was invoked. This button is grayed (disabled) if there are no records listed in the list box.
Click Page navigation to explore the pages. Use < and > to move from the previous group (5 pages) to the next group OR use << and >> to move from the First page to the Last page.
Note: The default condition in all lookup pages is 'Starts With’.
Lookup Procedure
The selection of a product name in the All Products page using the CPD lookup is taken as an example in the following section. Perform the following steps:
Click Forms > Full Data Entry > Product from the Menu bar to invoke the Product page.
Click the Lookup
icon
in the Product description field to open the CPD Lookup page.Enter '<Alphabet %>’ into the Local trade name field on the CPD Lookup page.
Enter the keyword in any of the search criteria.
Use the Condition to retrieve the desired results using the conditional option.
A condition is a rule that is tagged to the keyword for specifically displaying the products satisfying the conditional options.
Starts With - Displays products with the entered characters in any of the criteria field. When you append "%" to the keyword characters, the application displays all the products having the keyword characters.
Contains - Display only those products that contains the keyword characters.
Exact - Display the precise product matching the keyword characters entered in the search criteria.
Click the OK button.
or
Press ENTER.
The matching names are displayed in the lower panel of the page.
The Local trade names tab is displayed.
Select a record and then click Select button.
On completion of the lookup operation, the selected record is populated in the respective fields on the All Products page.
Note:
The tabs in the CPD lookup are enabled or disabled based on the value
set against each of them in the CPDLookup.properties
file. If the value is set to 'N’ then the tab is disabled. If the
value is set to 'Y’, then the tab is enabled. By default
all the tabs are enabled.
If the value for all the tabs is set to 'N’ then only the Preferred
Product Description tab is enabled.
CPD for IDMP
According to the European Medicines Agency (EMA) for the identification of medicinal products (IDMP) there are a set of common global standards for data elements, formats and terminologies for the unique identification and exchange of information on medicines for the following the fields.
Invented Name
Scientific Name
Trademark Name
Strength Name
Form Name
Container Name
Device Name
Intended Use name
The information to these fields are added in two levels of CPD.
PPD level
CPD>>Approval (LTN) level
o When added at PPD level
§ When you select the product from PPD level the IDMP fields are set in the Product level of the application.
§ When you select the product from the PPD level in the Product description lookup, the IDMP fields are populated from the Product level.
o When added at CPD >> Approval (LTN) level
§ When you select the product at the LTN level or Approval level, the IDMP fields along with Medicinal Product ID and MedID operation date are set at the product level and the LTN level.
§ When you select the product from the Product Description lookup>>Active Ingredient level then these fields are considered from its associated PPD level and populated to the corresponding product level details.
All the IDMP fields are available in the AQBE search.
Enhanced PPD (Preferred Product Description) tab
Enhanced PPD (Preferred Product Description) or PPD tab is the first tab in the CPD lookup. The display of these tabs depends on the property ’Enhanced preferred product description’ in CPDLookup.properties.
Based on your property settings the Enhanced PPD or PPD tabs are enabled/disabled.
The following table describes the scenarios to enable/disable the Enhanced PPD or PPD.
PPD |
Enhanced PPD |
Enabled Tab |
Y |
N
|
PPD Tab |
N |
Y |
Enh. PPD Tab |
Y |
Y |
PPD Tab (Default) |
N |
N |
PPD Tab (Default) |
By default ’Preferred product description’ is set to ’Y’ and ’Enhanced preferred product description’ is set to ’N’.
If the enhanced PPD tab is enabled, internal code, Preferred product description, Mfr name, DRL code, Form of admin, Product class, and Product group name along with the ingredient related data is displayed.
When you copy the data from the Enhanced PPD tab, the PPD information along with the ingredient information is copied to the respective tabs in ’All products’ module.
Form of Admin is also copied to the Therapy tab, when the data is copied from the new tab (Enhanced PPD level) of the CPD lookup to the AER.
When you search on Active Ingredient information and when the Enhanced PPD tab is enabled, PPDs based on entered criteria are displayed. During the process the Enhanced PPD tab appears on the top.
When search results are displayed dynamically from the active substance library, then the following message is displayed: ’Searched Active ingredient result is from the Active Substance library’.
You can sort the search result using the sorting feature available in the respective columns. The results are sorted based on character sorting logic as defined in the Oracle sorting query. You have to click the arrow provided adjacent to the respective columns labels to sorts the search results.
When multiple active ingredients are associated to a single product, the application displays all the active ingredients belonging to a specific product as a single entity in the Active Ingredients column corresponding to the product displayed in the Preferred Product Description column.
CPD Lookup Functionality
The CPD Lookup currently supports the querying or searching of Company Products based on the selection criteria data entered by user.
When the selection criteria are entered, the tabs pertaining to the criteria are highlighted.
The CPD Lookup is a search engine that helps you to retrieve the entire Product and the related information from the database. A product listed in the Lookup contains the details information about the Active Ingredients, WHO DD and Decode, WHO DD MPID, Manufacturer name, and Tradename, etc. When reporting the case, the reporter may have entered only the Product name, whereas, the case that is submitted to the authorities must have all the standard information as registered by the respective Pharmaceuticals company or manufacturer.
You can search for a product by providing any of the criteria like WHO DD code, Product name or Form of admin or using wild card search methods. When you search by providing search criteria, the application displays only the products matching with the search criteria and the Wild Card search method displays all the products.
Note: The above functionality is not applicable to the J12 Studies tab.
You can query the Active Substances from the Active Substance library directly, if you specify only the selection criteria for the Active Ingredient field.
The following points describe the selection process in detail:
If you enter the selection criteria for other product fields along with the Active Ingredient field then the system displays the data associated to the company product Different products having same Active ingredient may contain different active substances. When you search using the Active Ingredient as the criteria, the application displays all the products containing the Active Substances mapped to the same Active Ingredient. All the products are displayed in the Preferred Product Description column.
In the Active Ingredients tab, when you provide active ingredient as the only criteria in the CPD lookup the application retrieves the active ingredients from the Active Substance library. The successful retrieval of the search result is indicated by displaying the message “*Searched Active ingredient result is from Active Substance library” in the lower left corner of the screen. In this type of searching, the Products mapped to these Active Substances are not displayed under the Preferred Product Description column.
However, when search by providing based on active ingredient along with the Preferred Product Description tab and Local Trade name criteria’s, the results displayed are not retrieved from the Active Substance library, and the application does not display the message “*Searched Active ingredient result is from Active Substance library”.
The combinations for highlighting the different tabs have been described in the table below:
Search criteria entered for |
Behavior of the CPD lookup |
||||
Ingredients |
Local Trade name |
PPD |
Tab displayed on top |
Ingredients Table searched |
|
ü |
|
|
Active Ingredients |
Substance Library |
|
|
ü |
|
Local Trade name |
Associated records |
|
|
|
ü |
Preferred product description |
Associated records |
|
ü |
ü |
|
Local Trade name |
Associated records |
|
ü |
|
ü |
Preferred product description |
Associated records |
|
|
ü |
ü |
Local Trade name |
Associated records |
|
ü |
ü |
ü |
Local Trade name |
Associated records |
|
To search required active ingredients associated with the product:
On the Forms menu, select the Full Data Entry > Product tab.
Click the CPD Lookup.
The Company Product Lookup appears.
In the Active ingredient field, enter the active substance you are searching.
Click OK.
The
application displays the associated ATC Code, ATC Decode, Preferred
product description, WHO DD, Mfr.name, CDC, CAS Number, Strength,
Strength Unit, Class of ingredient, Type, Ingredient code, Ingredient
Name (Korean), Ingredient Name (English) , in the Active Ingredient
sub tab of the Company Product Lookup
NOTE: KDD Ingredient and KDD
Ingredient name in the Ingredients tab is also populated from CPD
lookup at PPD, LTN, Ingredient and J12 level.
NOTE: If an active substance is associated with multiple ATC codes and decodes, then only the first ATC code and decode are displayed in the search result screen.
The Product Description (Chinese) field on the FDE> Product screen is auto populated from Preferred product description (PPD), Local Trade name (LTN) and Active Ingredients level, when the user selects and save a product containing approval country as China, from the CPD lookup or auto-code and for the non-CPD products, the information is based on the WHO DD Chinese dictionary.
When the WHO DD entered for the corresponding Product matches with data in WHO DD Chinese dictionary, then if the WHO DD Decode is in Chinese language the same is populated, Else the selected Preferred WHO DD decode from Chinese dictionary for the corresponding WHO DD code in Chinese is populated in the case.
Else static text "无中文商品名" is populated in the case.
Note: The Product Description Chinese (entered manually /CPD coded) shall be over written if the user changes the WHO DD information in the case.
You can select the required Active Ingredient.
If the selected active substance is associated with multiple ATC codes and decodes, then the ATC from Ingredient level pop-up window appears with the list of associated ATC code and decode values that you can select.
Click the required ATC Code or ATC Decode and then click Select.
The application displays the selected values in the respective fields in the Full Data Entry > Product tab > Ingredient page.
Searching Products with Status in CPD Lookup
Click the lookup icon to display the CPD lookup window.
Enter the criteria from the CPD lookup screen.
CPD lookup provides options to search products based on status. You can query on 1) Active 2) Inactive and 3) Null options for Product and License. The default value for Product status and Licence status fields are set as Active. (Protocol lookup also provides options to search on Active and Inactive protocols.)
Note: By default, the Product status and License status are in Active status.
If a selection criterion is not entered, the application displays only those products which ’Product Status’ and ’License Status’ are in ’Active’ status.
The License status gets disabled when the Product contains inactive status.
The application allows you to perform all the standard operations on a case containing inactive Product/Protocol, except in the following conditions listed in the table.
Condition |
Result |
If you search contains inactive product/Protocol status and multiple local trade names of which, one trade name contains inactive status |
Displays all active and the inactive records at the local trade name level.
|
If you have an exception to access a case.
|
The application does not display the inactive product case in QBE and Workflow |
Product based security set to Most suspect product with Inactive product/protocol |
The application does not display the case in QBE and workflow. |
Note: Inactive WHO DD code is not auto-coded and not displayed in the CPD lookup page.
Searching Records with Disease Indication Lookup
In ARISg, you can perform a lookup on dictionaries and libraries. The lookup function is provided to automate and expedite the data-entry process. This lookup is invoked from Disease and Indications modules.
The lookup invoked from Disease Module shows, all indication Terms for all the drugs appears in the List of Indications page.
Lookup invoked from Disease Module Shows:
Disease Terms entered by the user in the AER
Indications from other products
The following data entry screens are provided with this lookup
Standard->Patient
Standard->Product
Forms->Diseases Screen
Forms->All Products ->Indications screen
Forms-> Suspect Drug at AE
Easy Entry->Diseases
Easy Entry-> Product->Indications Screen
Patient screen in Form view
Product Screen in Form view
In the data entry screens Click Copy. "Disease/Indications” look up screen is displayed. This is used to copy Disease/Indication terms onto the Disease/Indication tab. The fields that are displayed in the lookup are:
Term,
Term Type
Start Date,
End Date,
LLT Decode(code),
PT Decode(code),
ICD Code,
ICD Decode,
Product Desc.
Select a record from the lookup, a new disease record is created and the values in the selected record (as displayed in the lookup) are copied onto the new Indication screen.
Note:A checkbox "Show Indications for other products” is provided in the Lookup, which is available only when the lookup is invoked from the Indications module. This checkbox is provided to show the indication records from all the products other than the current product. If the record is already present and when you click 'Copy’ the values from the lookup (including with the term) are replaced in the existing record.
Searching Products with WHO DD Lookup
When you select the product from WHO DD Lookup, the Active ingredients and the Manufacturer name is captured and displayed into a case from WHO-DD dictionary. The Active and inactive ingredients are selected from DRL_SUBSTANCE table and Manufacturer code and name is selected from DRL_MFR table.
The product information (Active ingredients, Manufacturer name, and code) is replaced in the following scenarios on selection of product from WHO DD or CPD lookup:
When you select the product from the CPD lookup and select the product from WHO DD lookup for the same record, the CPD product information is replaced with WHO DD product information.
When you enter the product description manually and select the product from the WHO DD lookup for the same record, the CPD product information is replaced with WHO DD product information.
When you select WHO DD code from the WHO DD lookup, the CPD product information is replaced with WHO DD product information.
The product information (Active ingredients, Manufacturer name, and code) is deleted in the following scenarios on selection of product from WHO DD lookup or product is entered manually:
When you select a WHO DD code from the WHO DD lookup, the present product information is replaced with the active ingredient of the selected product.
When you select a product from the CPD lookup, the present product information is replaced with the active ingredient of the selected product.
Note: The WHO DD lookup supports the search based on 'ATC Codes' and 'Status’. The ’r;Status’ field allows you to search the records based on 'Active', 'Inactive', and Both. Based on the search performed, the 'Status’ column in the 'WHO DD Lookup Search Results' displays the status of the record as 'Active' and 'Inactive'.
By default, the application searches and displays the active records. The application allows you to select the Active records only.
When you select a Product from the CPD lookup, the Active Ingredients (active substances) of that product are automatically displayed in the Full Data Entry > Product > Ingredient tab. For the Ingredients to appear in this tab, the WHO DD code and decode value for the Product you have selected must have already been assigned in the Admin > Library > Company Product Dictionary Maintenance > Drug Product > Drug/Vaccine tab.
The application considers the active Ingredients of the product selected from the lookup only in the following scenarios:
If the active Ingredients are not available in the Admin > Library > Company Product Dictionary Maintenance > Ingredients tab, then the active ingredients of the product you select from the CPD lookup are displayed in the Full Data Entry > Product > Ingredients tab.
When a product you select from CPD contains multiple active substances, all the active substances are listed in the Ingredient tab with the Primary Active check box selected.
If the active ingredients of the product are already added in the Admin > Library > Company Product Dictionary Maintenance > Ingredients tab, then the application does not consider the active ingredients of the product you select from CPD which has the WHO code and the decode value.
The country of approval of the drug is displayed along with WHO DD code, WHO DD decode and Active Substance in the following WHO DD Lookup page.
The changed WHO DD lookup is available through QBE and in all the applicable forms.
When you search for a product in the WHO DD lookup, the multiple ingredients in the active substance are displayed at the bottom of the WHO DD Lookup.
Searching Contacts with Contacts Lookup
The Contacts Lookup enables you to select one or more contacts for distribution cases. The selected contacts appear in the Distribution page.
You can also search for contacts in the Contacts Lookup. The search can be based on the following criteria:
Contact Type
Contact Name
Authority
Format Type
Data Privacy
Blinded Report
Preferred Route
Route through agXchange - OST
SIR Contact
You can search for contacts using the features:
Starts with
Match Case
EDQM Lookup functionality
The selection of EDQM Term ID and Term Names in Route of ADMIN, Parent Route of Admin and Pharmaceutical Dose Form, using the EDQM Lookup is taken as an example in this section.
The following screens contains EDQM Lookup:
• FDE>Product
• Vigilance>Product>Others
• ISP screen> Product
• E2B(R3) Form > Product
• FDEProduct> Unblind screen
Perform the following steps:
1. On the Menu bar, click Forms Full Data Entry General > Product.
The Product page appears.
2. Click the Term ID look up on the Route
of Admin/ Parent Route of Admin/ Pharmaceutical Dose Form tabs.
The EDQM Lookup screen displays:
3. Enter the keyword in any of the search criteria.
4. The Current “Term Status” is displayed by default and the user can select only the current term status. The NON-CURRENT, NULLIFIED and PROVISIONAL statuses can only be viewed but not selected.
5. The default Term Type is “Route of Administration/ Parent Route of Administration” for ROUTE OF ADMIN and PARENT ROUTE OF ADMIN Tabs, and it is “Form of Administration” for Pharmaceutical Dose Form tab.
6. Use the Condition to retrieve the
desired results using the conditional option.
A condition is a rule that is tagged to the keyword for specifically
displaying the Term name satisfying the conditional options.
• Starts With - Displays Term ID with the entered characters in any of the criteria field. When you append "%" to the keyword characters, the application displays all the products having the keyword characters.
• Contains - Display only those Term ID that contains the keyword characters.
• Exact - Display the precise Term ID matching the keyword characters entered in the search criteria.
7. Click OK.
Or
8. Press ENTER.
The matching names are displayed in the lower panel of the page.
The Term id, Term Name and Status are displayed.
9. Select a record and then click Select.
On completion of the Lookup operation, the selected Term ID and Term
Name is displayed in their appropriate fields.
Working with User Dictionaries
ARISg Codelists reduces data entry time by allowing you to choose from the pre-defined options. User dictionary operate like codelists, but populate many fields. These dictionaries enable you to 'look up’ the standard information and copy it into the case.
Company Unit Dictionary
The Company Units dictionary tracks information of the company's different business units, such as addresses and contacts. Choose the appropriate business unit and the associated information is automatically entered into the case.
Company Drugs, Devices and Vaccines Dictionaries
Company Drugs, Devices and Vaccines dictionaries track many aspects of a company’s products, including Trade name, Approval information, WHO DD code, etc. During data entry, the system automatically retrieves all information regarding the product(s) when you enter a particular data (For example: Trade name).
Japanese Drug Dictionary
The following standard drug dictionaries are supported:
Japanese Drug Code (9 digits)
Japanese Drug Code (12 digits)
NOTE: JPN_DRUG_CODE_9 and JPN_DRUG_CODE_12 are supported to generate custom reports.
The Japanese Drug Code (9 Digits) Dictionary is a lookup from where you can search and select the appropriate drug code for a drug record. The drug records are retrieved from the library based on the search criteria provided.
The drug record details include: Medicine Code, Product Name (Japan Product Name (English)), General Name (Japan Product Name (English)), Manufacture’s Name, Dosage Route and Maintenance.
The Maintenance column shows the status of the drug record, where the alphabet characters A, B, or C are displayed corresponding to each record. The significance of these characters are as follows:
A – Indicates the record is added.
B – Indicates the record is updated.
C – This letter is greyed out indicating the record is not available and deleted. Japanese Disease Dictionary
Protocol/Study
For clinical cases, the Protocol/Study dictionary provides a complete list of Protocols, Studies etc. Blinding information and other data associated with the Study are automatically entered into the case.
Laboratory Data
The Lab Data dictionary contains the information related to the various laboratory tests including normal values etc. A company provides standardized Laboratory Tests that can be copied into the case.
Contact Directory
The Contact Directory is the directory of all contacts, including reporters, monitors, authority contacts etc. When you select a contact, their name, address and telephone number(s) are entered automatically into the case. This directory does not require any maintenance. It is automatically updated as and when a new person is associated with a case.
Korean Drug Dictionary
The Korean Drug Dictionary is a lookup from where you can search and select the appropriate drug code for a drug record. The drug records are retrieved from the library based on the search criteria provided.
The drug record details include: Medicine Code, Product Name (Korean Product Name (English)), General Name (Korean Product Name (English)), Manufacture’s Name, Dosage Route, and Maintenance.
KDD Ingredient
The KDD Ingredient lookup displays the Ingredient code, Ingredient Name (Korean) and Ingredient Name (English). On selection of any record from KDD Ingredient Lookup, the Ingredient Code and Ingredient Name (Korean) are populated in the Code and Decode fields.
Medical Dictionaries
The Medical Dictionaries supported in ARISg are standard pharmaceutical dictionaries that have been adopted internationally, including the latest addition of the MedDRA dictionary, recommended and supported by ICH (International Conference on Harmonization).
ARISg provides extensive support for the standard dictionaries, and contains features for maintaining the dictionaries in ARISg as and when dictionary updates are available.
Types of Dictionaries supported
The Medical Dictionaries currently supported in ARISg include:
WHO-ART
COSTART
MedDRA
HARTS
WHO-DRL
WHO-ICD
ARISg also supports the FDA MedWatch Reporting Form Codes Manual.
Automatically Coding the Dictionary Information
ARISg provides various methods of including these standardized dictionaries into an AER. You can 'look-up’ relevant information from the dictionary. The system can automatically 'code’ the dictionary information to the case while data is being entered. Alternatively, a medical examiner or a dictionary expert can code the cases at a later point.
In the example given, enter the Reported term given by the AE reporter and in the AE code field, the dictionary information loads automatically into the case. The Autocodingfeature provided in ARISg matches a reaction, a disease, a procedure or a product to its 'standard’ in the medical dictionary. At times, the data provided by the reporter is not an exact match to the data in the dictionary. ARISg excels in its support of dictionaries by providing a Thesaurus for several dictionaries.
The Thesaurus provides 'synonyms’ or a mapping between the reporter statement and the standard dictionary term. The Thesaurus can be manually updated, providing complete and secure control over the autocoding feature. In addition, ARISg can 'learn’ the mappings automatically from cases as dictionaries are manually mapped to terms by users.
Over time, the system learns enough, and the average case rarely needs manual mapping to the dictionaries.
Autocoding MedDRA Dictionary
The Reaction term can be autocoded using the MedDRA dictionary Lookup. MedDRA dictionary supports LLT code and PT code. These are provided as lookup fields in ARISg.
When you select LLT code from the Lookup, the corresponding PT code, Primary SOC code and Case SOC code are populated.
When you select the PT code from the lookup, the corresponding Primary SOC Code and Case SOC code are populated.
In all the applicable screen, the SOC decode is suffixed with an asterisk (*) to indicate that it is a Primary SOC term.
Note: You can also enter the LLT code and PT code manually and press the [TAB] key to populate data in the fields mentioned above.
Searching Complex Terms on MedDRA Dictionary
Based on the search criteria that you specify in Reaction, Disease, Indication and Lab data screens, application retrieves the appropriate results using the algorithm.
ARISg searches for MedDRA terms in the following sequence:
Replaces multiple spaces with a single space
Identifies and eliminates the stopwords in your search criteria.
Searches for an exact match of the terms you enter, whenever you delete any stopword common to both ARIS and ORACLE stopword list.
Note:
Searches for MedDRA terms containing all the words you enter in any order.
Randomly searches on the terms you specify, without following any specific sequence.
Searches by filtering and grouping words.
For every term you enter, application selects an appropriate term for coding.
After searching for the MedDRA terms, ARISg displays the results in the Complex search for MedDRA screen.
Whenever you eliminate a stopword from the Oracle stopword list, the application first removes these stopwords from your search criteria and then performs a complex search on the remaining reported terms.
For example: If you enter the search criteria "Fever was present along with cold”, the application removes the stopwords: was, along with from the search criteria and then performs a complex search on the remaining reported terms Fever and Cold.
Remember:
If you have enabled "Automatic lookup” in User Preferences screen, then you have to manually close the "ART lookup” screen that appears before Complex search for MedDRA screen.
If you close the "Complex search for MedDRA screen” window without selecting any record, then the application does not display any data in the autocoding fields of data entry screens.
If the application does not find the MeDRA terms you specify after performing a complex search, then it displays the message as,"No match via MedDRA automatic coding for this record. Manual coding required."
This message does not appear when the reported trm gets automatically coded.
For more information about Automatic calculations, refer to the Data Entry Features guide.
Calculating Data Automatically
ARISg contains many data fields that can be automatically determined based on other case data. This feature provides automatic valuesfor many fields reducing data entry time considerably. Some of these fields include:
Patient Age at the time of event
Latency
Therapy Duration
Reaction duration
Gestation Period
Patient height conversion
Patient weight conversion
Body surface index
Body mass index
End overlay
Total dose
Approval number assignment for suspect drugs
Calculating Seriousness Type
A new option "Seriousness type” is introduced in the AER characteristics screen. When you enter seriousness information in the "All reactions” screen, then based on the selected option for seriousness type, the "Seriousness” fields in AER characteristics screen are automatically displayed. That is, when the seriousness type is set to "Automatic” and you enter seriousness as "Serious” in All Reactions screen; the corresponding fields in AER characteristics are automatically displayed with the same value "Serious”.
The seriousness is automatically displayed/not displayed based on your selection of the option "Manual”.
ARISg enables you to maintain a list of serious MedDRA terms. Based on the MedDRA term details that you enter in the Admin module, the application displays these MedDRA details in the data entry screens at Reaction level.
Also, ARISg maintains a list of serious MedDRA terms and additional standard validations (5022 and 5023) are introduced to display the seriousness based on these MedDRA terms. Based on the MedDRA term details that you enter in the Admin module and status of these two new validations, the application displays Seriousness and "Other Serious (Important Medical Events)” field details in the data entry screens at Reaction level.
5022 validation sets the seriousness at reaction level when the status in On and other MedDRA details are completed.
5023 validation sets the "Other Serious (Important Medical Events)” in AE characteristic as Yes at the reaction level, when either the seriousness "As per reporter” and "As per company” is set to Yes (when the status is On).
For more details on Maintain Serious MedDRA Terms, refer to the guide Library Maintenance.
For database details, refer to the section "ARIS_SERIOUS_MEDDRA_TERM_MAINT” in ARISDB guide.
For roles and privileges maintenance, refer to the guide User Security.
Calculating Patient Age at the Time of Event
The patient age at the time of event is the difference between 'Earliest AE onset date’ and 'Patient date of birth’. The calculated value can be in days, months, or years.
If the patient is less than a day old, and when the unit is set as Hours, then the Age at the time of event is not calculated if the Age Type is set to Automatic.
You can enter Age manually in the above case by setting the Age Type as manual.
The age is automatically calculated only if the age is more than the set Unit for e.g., when the patient's age is more than one year, and if the unit is set to Year, then the system automatically calculates the age.
For example:
Patient date of birth =06/Mar/1998
Earliest AE Onset date = 07/Mar/1999
Then
Patient Age = 1 year
Calculating Latency Time
The difference of 'Therapy start date’ and 'AE onset date’ is calculated to give Latency. Latency is calculated in days, the maximum value being 999 days. All values beyond 999 days are converted to years. If the calculated value is lesser than a day, then Latency is calculated in terms of hours, minutes and seconds.
NOTE: If the 'AE onset date' and 'Therapy start date' are same, then application does not display any value for 'Latency'.
When it is lower than a day or 24 hours, the duration calculation is done using the following logic:
If the duration calculated is 0-180 seconds, it is expressed in seconds.
If the duration calculated is 3-180 minutes, it is expressed in minutes.
If the duration calculated is 3-24 hours, it is expressed in hours.
If the duration calculated is greater than 24 hours, then it is calculated in days.
Note: Latency calculation is dependent on Validation #5004 and #5018. Refer section Automatic calculation under the topic Batch Validations for more details on the validations mentioned above.
Calculating Last Dose Latency
Last Dose Latency is calculated based on the following formula:
Onset Date – Latest Therapy End Date
Note: If the 'AE Reaction onset date' and 'Latest Therapy End date' are same, then the application does not display any value for 'Last Dose Latency'.
Calculating AE Duration
Adverse Event Duration is calculated based on the following formula:
Duration = Cessation Date - Onset Date
Calculating Daily Dose
Daily Dose is calculated based on the following formula:
daily_dose = unit dose * frequency/frequency time;
Calculating Therapy Duration
The difference between 'Start therapy date’ and 'End therapy date’ is calculated to give Therapy duration. Therapy duration is calculated in days, the maximum value being 999 days. All values beyond 999 days are converted to years.
If the calculated value is lesser than a day, then Therapy Duration is calculated in terms of hours, minutes and seconds.
Note: Therapy duration calculation is dependent on Validation #5003 and #5016. Refer section Automatic calculation under the topic Batch Validations for more details on the validations mentioned above.
Calculating Reaction Duration
The difference between 'Earliest AE onset date’ and 'AE Cessation date’ is calculated to give Reaction duration. The calculated value can be in days, Months, or Years. If the calculated value is lesser than a day, then Reaction Duration is calculated in terms of hours, minutes and seconds.
Note: Reaction duration calculation is dependent on Validation #5002 and #5017. Refer section Automatic calculation under the topic Batch Validations for more details on the validations mentioned above.
Calculating Gestation Period
The difference between "Earliest AE Onset date” and Calculated "LMP date” ("LMP date” is added with 14 days) and the resulting value is divided by 7 to give the Gestation period i.e.
(Earliest AE Onset date - (LMP date + 14 days))/7
Note: Both dates should be precise. The number is truncated when computed in decimals (14 days is calculated as 1 week)
Converting Patient Height
(Convert Height unit of Patient to Centimeters)
If the patient height is entered in inches, then the height is converted to centimeters by multiplying the entered value with 2.54. If the resulting height in centimeters exceeds 9999, then the value is discarded.
Converting Patient Weight
(Conversion of Weight from pound/ounce to Kg.)
If the patient weight is entered in pounds, then the weight is converted to kilograms by dividing the entered value by 2.2046.
If however the patient weight was entered in ounce, then the resulting weight is further divided by 16.
Calculating Body Surface Index
If the patient’s height is entered in centimeters, and weight in kilograms then with the help of underlying formula the Body surface index of the patient gets automatically calculated.
BSI = square root (Patient height (in cm) * Patient weight (in kg) / 3615)
In case the height is provided in inches and/or the weight in pounds, the system uses the following formula:
BSI = square root (Patient height (in inches) * Patient weight (in lb.) / 3131).
Calculating Body Mass Index
With the help of underlying formula, the system calculates the body mass index of the patient.
BMI = Patient_weight (in kg)/ (Patient_height (in m))2
When the height of the patient is provided in inches or/ and weight in pounds/ounce, the system automatically converts the values to fit into the above formula.
Calculating End Overlay
The date field is automatically calculated using the following formula.
End overlay (Date) = Therapy start date + Therapy duration (days) + overlay period (days)
Note: The value of the field "Therapy Duration” is accepted in the calculation only if the unit entered is "days”. In case the value is not in the unit "days”, then by default the system considers Zero as the value for the field "Therapy duration”.
Calculating Total Dose
The Total dose is calculated based on the following formula:
Total dose = Daily dose * Therapy duration (days)
Note: The value of the field "Therapy Duration” is accepted in the calculation only if the unit entered is "days”. Incase the value is not in the unit "days”, then by default the system considers Zero as the value for the field "Therapy duration”.
A corresponding entry for this is present in the validation module enabling you to turn the automatic calculation off if it is not required.
Auto Saving an AER
In case of abnormal termination of the operating system or ARISg system, it is possible to recover the unsaved changes in the case using the 'Autosave’ option.
To select the 'Autosave’ option:
Click Tools >Options>Preferences from the main menu to invoke the Preferences page appears.
Select the check box Autosave and click the Save button.
If the application terminates abnormally during data entry and 'Use Autosave’ option is set, a '<USERNAME>_<DBID>.dat’ file is created on the server. A reminder page is displayed when you log on again providing information of the unsaved AER.
The Autosave page displays the AER no, AER ID, User ID, Database ID, Version number, Local Version No., Workflow Activity ID, and date and time during the start up of ARISg.
ARISg obtains the date-time of the client system stored in the Autosave file and compares it with the client system date-time when you login again after the abnormal termination of ARISg. If this time gap is less than seven minutes, the application displays Auto save page.
If you wish to restore the AER in update mode, exit the application by clicking the Signoff button and login after seven minutes.
If you continue by clicking the OK button, the case is opened in read only mode and you will be unable to restore the previously unsaved case.
Click Cancel button to lose the changes permanently.
If you login to the application after seven minutes of abnormal termination of ARISg, the following page appears.
Click OK button to restore the unsaved information Clicking "Cancel” will erase the contents of Autosave.dat file, and you cannot restore the unsaved information later or, click Cancel to lose the changes permanently.
If the case is not saved after its recovery, the system does not keep track of the newly entered/modified field information.
On saving the case, the recovery file is emptied and Autosave is activated when you start entering data. Only the user who created the case can restore unsaved information. The unsaved information can be restored only to a case, which is in update mode.
Note: The auto save file is saved in the location specified in the Aris property utility.
Copying an AER
You may need to duplicate an existing case with similar information. ARISg offers a copy feature to create an exact copy of an existing AER with a unique AER number. The newly created AER can be modified. This is useful when you need to enter several AERs with similar data.
When you copy a logically deleted case, the application copies the case as a standard case and not as logically deleted case.
ARISg also allows you to copy a part of an AER.
To copy a case, open the AERyou want to copy.
Click CASE > Copy option from the main menu. ARISg also allows you to partially copy a case. While copying an AER, an option to select the required records is provided.
By default, only those check boxes which are marked in the Installation parameter of ARISg Administrator, will be marked in Copy AER screen of ARISg client.
Click Copy, only records those are selected are copied.
In the ARISg Administrator, Installation parameter screen:
If the option Value is marked then the same option in the Copy AER will be marked by default.
If the option Runtime change allowed is marked in the Installation parameter against the selected options, then the options can be changed in this screen. If the Runtime change allowed parameter is not selected, then those options are disabled and cannot be changed
If you click on Copy, only the selected data will be copied based on the options selected in Copy AER screen.
If you select Copy core information only check box and also other check boxes (For example: Product), the system will copy Product information also along with the core information of the case owner unit.
If the option Value is marked in the Installation parameter against the selected options, then the value present in that field gets copied to the new AER.
If the option Runtime change allowed is marked in the Installation parameter against the selected options, then the options can be changed in this screen. If the "Runtime change allowed” parameter is not selected, then those options are disabled and cannot be changed.
If Copy core information check box is selected then only core information of the case owner unit and Global data of Owner unit is copied.
Note: The Copy core information only check box will be displayed in Copy AER screen only when the Protect data using ownership concept is set to Yes.
Click the Copy button in the Copy AER page to copy all the details of the AER, or select the appropriate check boxes to specify the information that is to be copied. The AER number of the AER being copied is displayed in the AER no field.
Specify the AER number to which AER is to be copied in the Copy to field. If AER Auto-numbering is enabled at your site, the AER number is added automatically.
Click the Copy button to copy the records or Cancel button to cancel the operation.
Both owner unit users and non-owner unit users can copy the case if the installation parameter "Protect data using ownership concept” is set to Yes.
When you select "Retain case ownership” checkbox while copying the case, the application retains the ownership of the case that is copied from.
When the Retain case ownership checkbox is not selected, the application assigns the logged in user as the owner of the case.
You can enable or disable the Retain case ownership, option based on the installation parameter Retain case ownership settings in the administrator application.
Select Document option to copy attached documents of AER Literature to the new AER.
Note: When the case is copied, transmission related fields such as Company Number, Authority number, Report Duplicate and Other number will not be copied.
When you select the "Patient” checkbox, then all the new fields related to pregnancy are copied along with the AER.
For more details on the new pregnancy fields, refer to the section "Enter Pregnancy Information” in the Data entry process guide.
Copying Private Data
Privileged/ Unprivileged user |
Private Data |
Privileged user(access to private data fields) copying the case with private data |
The private data is copied to the new case regardless of the Retain case ownership check box settings in ARISg application. The data is encrypted in the database.
|
Unprivileged user (no access to private data fields) copying the case that contains private data, and Retain case ownership option is not selected,
|
Private data is not copied to the new case. |
Unprivileged user copying the case that contains private data and Retain case ownership is selected.
|
Private data is copied to the new case. The data is encrypted in the database and displayed as blobs.
|
Creating Single Copy
The application allows you to create single and multiple copies of a case by using the copy options. Copy option helps you to enter similar data for multiple AERs.
Complete the data entry and save the case, the application allows you to copy the case to a new case with the existing data.
For example:
To copy a case VYT-2009-00003 to VYT-2009-00004 from the copy AER page:
Open the case VYT-2009-00003 from workflow case list.
On the CASE menu, click Copy. Copy AER page appears with AER no. VYT-2009-00003.
In the Copy to field enter the AER no. VYT-2009-00004. The application copies the contents of the AER into the specified AER.
On the Copy Options section, specify the options to copy.
Click Copy, to copy the data into the new AER. The Progress bar indicates the copying in progress and the Workflow message appears. Case submitted to Workflow server
Click OK, confirmation message appears. AER copied successfully
Click OK, the case VYT-2009-00004 opens.
Note: When a new version is created, the previous version of the case is locked for copying. Hence only the latest version of the case can be copied. You update the data in the latest version to display in the report.
Creating Multiple Copies
Complete the data entry and save the case, the application allows you to copy the case to multiple cases with the existing data. Save the AER, AER number appears automatically with the following settings. Make sure to set Numbering scheme as Installation Defined in the Automatic Coding/Labeling page from the Administrator Installation parameter to view the Single copy, Multiple copy along with the Link AER option in the Copy AER page.
Example:
Create three copies of the case 200912AG0180 from the Copy AER page:
Open the case 200912AG0180 from workflow case list.
On the CASE menu, click Copy. The Copy AER page appears with AER no. 200912AG0180.
Copy to field displays AUTO. AUTO indicates that the application adds the number automatically.
Select Multiple Copies option and enter 3 in the text field to create 3 copies of the AER.
On the Copy Options section, specify the options to copy.
Click Copy to copy the data into the three new AERs. The Progress bar indicates the copying in progress and the message "3 copies of AER made successfully and submitted to workflow server" appears.
Click OK.
The AER Copy History appears.
The AER Copy History displays the list of the cases that are copied from the master case with the AER numbers. The AER numbers are consecutive numbers, incremented from the last saved record, in the database.
NOTE: By default, the screen displays only 12 records. Click More to view the complete list of copied AER records.
Click the X button to close the AER.
To view the Copied cases, search the AERs in the workflow case list using the filter option. The copied cases appear in the Workflow case list.
Linking Cases
During creating single or multiple cases, the application allows you to link the case to the single AER or multiple AER copies.
Linking case in Single copy
The application allows you to link AERs, when you create a single copy.
Click single copy,
Select Link AER? and specify the reason for linking and enter the Reason for linking text (If present).
(For information to the steps single copy refer to the section: Creating Single Copy).
To view the Link AER information
Click the Link AER on the General tab of Full data entry page of the newly created case.
Example to link multiple cases:
Create three copies of the case 200912AG0180 and link the AER to the copied cases:
Open the case 200912AG0180 from workflow case list.
On the CASE menu, click Copy.
Copy AER page appears with AER no. 200912AG0180.Copy to field displays AUTO.
Indicates the application adds the number automatically.Select Multiple Copies option and enter 3 in the text field to create 3 copies of the AER.
Select Link AERs, specify the Reason for Linking and enter Reason for linking text (If present).
Click Copy, to copy the data into the three new AERs.
The Progress bar indicates the copying in progress and the message appears.
- 3 copies of AER made successfully and submitted to workflow server.Click OK, to close the AER.
To view the Copied cases
with the link AER data, search the AERs in the workflow case list
using the filter option. The following copied cases appears with link
AER data from the Workflow case list:
200912AG0194, 200912AG0195, 200912AG0196
Open the case 200912AG0180.
Click the Link AER on the General tab of Full data entry page.
Navigate to view the link AER details for the 3 AERs (200912AG0194, 200912AG0195, 200912AG0196).
Tracking the Owner Unit of AER
ARISg tracks the owner unit of the AERs at AER level. This is automatically set as the company unit that created the AER (company unit of the user). This feature is used in accordance with the parameter 'Protect data using ownership concept’. The AER variables determine the security on the fields when this option is enabled.
If the parameter "Protect data using ownership concept” is set to Yes, the global records of the same case can be updated simultaneously by multiple users belonging to different units. Multiple users from the same non owner unit can not update global data of the same case.
If the parameter "Protect data using ownership concept” is set to No, only one user at a time can update the case.
Note: Only the owner unit of the case can create a new international version of the case.
Recording Owner Unit
In a distributed environment, several company units are able to update the same AER by adding the data relevant to their units (For example: approval number of the drug in the country).
ARISg uses the concept of owner unit for data where more than one company unit enter records. In this case, the information of the company unit of the user who added the record is set automatically. The system provides simultaneous global records data entry support for multiple non owner unit users on the same case.
Protecting the Data Created by Other Company Units
The ability to restrict other company units to update data within a case is supported by ARISg based on the ownership concept.
This ability is controlled by an installation parameter Protect data using ownership concept.
When this parameter is set to "Yes”:
ARISg allows the entry/update of core fields only to the users who belong to that particular unit, which created the AER.
ARISg allows the entry/update of corporate core fields only to the users who belong to that particular company unit, which is identified as corporate unit.
ARISg sets the fields as read-only in order to protect the editing by the users for fields that should not be edited.
The global records of the same case can be updated simultaneously by multiple users belonging to different units.
Case Versions
AER versions allow complete tracking of a case in its various stages. This feature allows a company to create new versions of a case. For example: if new data arrives after a company has informed a health authority of a case, a new version can be created to track this new information. This allows you to keep a ’snapshot’ of the case as it existed when it was submitted to the authority; and to enter new data without altering the data as it was reported.
Since only the latest version of a case can be modified, this feature can be used to accurately track when data was received, and which data was reported to what authorities throughout the AER’s life.
Depending on the settings of the installation parameters, ARISg supports the concept of local version number. Refer to the section, Local Versions for more details. If the local version scheme were enabled, a local version number would be created. .
To create a new version, click the CASE > New Version option from the menu bar. The case is copied and the version number is incremented by one, and the latest received date is cleared. The previous version of the case is locked.
If a new version of the case is created (through the option CASE > New Version), and if the current version is opened by another non owner unit user(s) at the same time, ARISg displays the message, ’AER has been opened by another non owner unit(s). Creation of new version is not allowed’. New version is not created.
The message is displayed only when the installation parameter, ’Allow new version for owner unit, when AER is opened for global data update by non owner unit user’ is set to ’No’ and Ownership concept is also enabled.
When a new version of the case is created by an unprivileged user, then the Private data is copied to the new version and data appears in the encrypted form.
When a privileged user creates a new version of the case, then the Private data is copied to the new version. Data appears in the decrypted form, but stored in encrypted form in the database.
When the installation parameter ’Copy global records of other units on creation of new version of AER’ is ’No’ and Ownership concept is also enabled, the system copies only the latest global records of the current user to the new AER version, while creating a new version of the case.
If the installation parameter ’Create new version of AER on undelete’ is set to ’No’, a new version of the undeleted case is not created.
If the following installation parameters:
Protect data using ownership concept is set to ’Yes’
Use Local version scheme is set to ’Yes’
Allow del/Undel of AERs only by owner unit is set to ’Yes’
Create new version of AER on undelete is set to ’Yes’
Then the owner unit user can undelete a case and a new version of the same case is created. A non-owner unit user cannot undelete a case that belongs to the other unit. A message, ’Unable to Undelete the AER, since it belongs to different unit’ is displayed in such a scenario.
Follow-up Cases
The application allows you to create Follow-up cases either through Universal Connector[UC] or Webservice.
When ARISg receives request from IRT to create a Follow-up for a case through Webservice, the ARISg creates a new Version for the specified AER. The new AER ID, Version, and LRD [with date format] are sent to IRT application with status as 'SUCCESS’.
If ARISg fails to create Follow-up for the following conditions, then the Status is sent to IRT application as 'FAILED’ with respective status codes:
INITIAL_AERID_NULL
INITIAL_AERID_EMPTY
INVALID_DATE_OR_DATE_FORMAT
AER_LOCKED
LATEST_VERSION_UN_APPROVED
AER_NOT_FOUND
DATABASE_CONNECTION_FAILED
AER_FOLLOW_UP_CANNOT_BE_CREATED
SUCCESS
AER_NEW_VERSION_WORKFLOW_IS_NOT_CONFIGURED
Note:
If LRD is not sent through IRT application, then the ARISg creates
a Follow-up with current system date as LRD.
The REMS data is not copies to the new version of the case.
The ”Condition for creating new version” is not considered by the Webservice.
When the case is logically deleted, the application retains the case in database and creates a new version for that case. Based on the When undelete AER workflow parameter settings in Admin, the logically deleted case is displayed under that workflow.
Tracking Case Versions
ARISg allows you to enter additional information without changing the data in the original case. You find versioning useful when you receive significant follow-up information after submitting the initial version to the regulatory authorities. The application tracks the version number and cannot be changed by any user, including a System Administrator.
Notice the version number displayed in parentheses on the Title Bar of the main application, following the AER number.
AER versions allow complete tracking of a case in its various stages. This feature allows a company to create new versions of a case.
For example: If new data arrives after a company has informed a health authority of a case, a new version can be created to track this new information. This allows you to keep a 'snapshot’ of the case as it existed when it was submitted to the authority; and to enter new data without altering the data as it was reported.
Since only the latest version of a case can be modified, this feature can be used to accurately track when data was received, and which data was reported to what authorities throughout the AER’s life. Depending on the settings of the installation parameters, ARISg supports the concept of local version number. Refer to the section, Local Versions for more details. If the local version scheme were enabled, a local version number would be created.
To create a new version:
Click the CASE > New Version option from the menu bar.
The case is copied and the version number is incremented by one, and the latest received date is cleared. The previous version of the case is locked.
Note: If a new version of the case is created (through the option CASEàNew Version), and if the current version is opened by another non owner unit user(s) at the same time, ARISg displays the message, 'AER has been opened by another non owner unit(s). Creation of new version is not allowed’. New version is not created. The message is displayed only when the installation parameter, 'Allow new version for owner unit, when AER is opened for global data update by non owner unit user’ is set to 'No’ and Ownership concept is also enabled.
When a new version of the case is created by an unprivileged user, then the Private data is copied to the new version and data appears in the encrypted form.
When a privileged user creates a new version of the case, then the Private data is copied to the new version. Data appears in the decrypted form, but stored in encrypted form in the database.
When the installation parameter 'Copy global records of other units on creation of new version of AER’ is 'No’ and Ownership concept is also enabled, the system copies only the latest global records of the current user to the new AER version, while creating a new version of the case.
If the installation parameter 'Create new version of AER on undelete’ is set to 'No’, a new version of the undeleted case is not created.
If the following installation parameters:
Protect data using ownership concept is set to 'Yes’
Use Local version scheme is set to 'Yes’
Allow del/Undel of AERs only by owner unit is set to 'Yes’
Create new version of AER on undelete is set to 'Yes’
Then the owner unit user can undelete a case and a new version of the same case is created. A non-owner unit user cannot undelete a case that belongs to the other unit. A message, 'Unable to Undelete the AER, since it belongs to different unit’ is displayed in such a scenario.
Editing a New Version of a Case
Owner opens a case from QBE
Creates a new version of the case
Makes changes to the new version of AER.
Submits the AER to the workflow
The application allows to create a new version of a case when the non-owner simultaneously updates the global information for the same case. The following message appears when the non-owner saves the case. Newer version of the case has been created after you opened the AER for update. Your recent update to global data may not be available in the latest version of the AER
Editing of the new version of the case depends on the following parameter settings:
Protect data using ownership concept set to Yes
Use local version scheme set to No
Allow new version for owner unit, when AER is opened for global data update by non owner unit user set to Yes
Copy global records of other units on creation of new version of AER set to Yes
You require update privileges on data entry forms to edit the case
When your administrator has set the parameter Copy global records of other units on creation of new version of AER to Yes then the application copies the global data along with the core data (fields which you cannot edit) of the case.
When set to No the application copies only the core data of the case.
Note: The application allows editing of the latest version of a case when a single user opens the case.
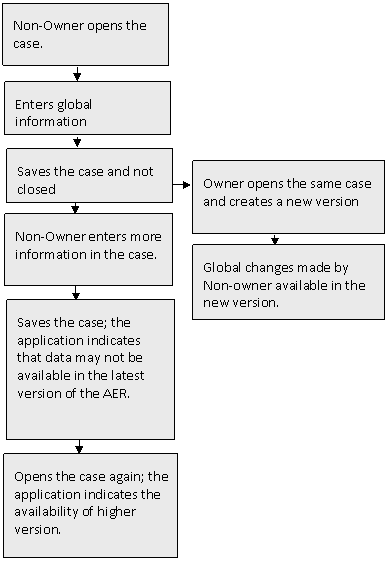
Note: The AER Latest received date is automatically populated for new versions of the case ONLY if the 'protect data using ownership concept 'parameter is set 'Yes'.
When you create a new version of AER, the associated Literature documents of AER literature is copied to the new version of AER.
Defining Local Versions
You can have local versions of an AER. The use of local versions is supported by an installation parameter in the System Administrator module.
When the use of local versions is enabled by the System Administrator, then a local version can be created by affiliates after they receive and modify a case from another site (assuming each affiliate has its own ARISg database). Company units create a local version when data is added to meet its local management and regulatory reporting requirements.
The local version helps to identify the changes made by an affiliate.
The System Administrator can set an installation parameter Use Local version scheme. When the parameter is off, the local version number field always remains zero.
When the local version scheme is in use, manual creation of a new version always creates a new local version only, i.e. it is not possible to create a new international version manually.
If Local version concept is not in use, non owner unit can not create a new version.
If the installation parameter, 'Local version scheme’ is set to 'Yes’ and ownership concept is set to 'Yes’ , only one user can open and update the case at a time. If a user opens a case that is opened by a owner unit user or non-owner unit user, the case is opened as read-only. The New Version option is disabled in such a scenario.
Note: If the Installation parameter 'Use local version scheme’ is set to "Yes”, ARISg imports all the versions of the case (including local versions) that are exported.
Displaying AER Version Number
When the local version number is in use in all list boxes where AER Version number is displayed, the number is displayed in the format <international version number>. <Local version number>.
When the local version number is not in use, the international version number is displayed.
Approving a Case
A case that is under process or has not been medically confirmed is not generally included in queries and line listing reports. To enable this, ARISg supports the concept of the approval status (scratch area). Use of this feature is optional, and can be either enabled or disabled by the System Administrator.
When enabled, all new cases and new versions are entered into the scratch area i.e. with the status 'Not approved,’ and only the latest approved versions will be included in queries and line listing reports.
In ARISg with Workflow, a case will only be marked as approved, when the workflow activity that has been defined to approve the case is completed.
Note: A case cannot be switched from Approved to Not approved status. For more details on AER Approval, refer to the User GuideàUser Preferences.
Setting of Approval information for "Imported” cases:
The approval information settings for the imported AERs are controlled by a property along with the installation parameter "Use unapproved AER concept”.
This can be used when you want to import the AER as in the exported file (or) if you wish to review and approve the imported cases manually.
The property "IMPORT_AS_APPROVED” present in "aris.properties” file is used for ARISg import to accept the values 'true’ or 'false’.
If the approval concept is set to 'No' then, AERs are always imported as 'Approved’ and the highest version of the AER is marked as 'Last Approved'. The lower versions of the AER are marked as 'Approved'.
If the approval concept is set to 'Yes' and the property "IMPORT_AS_APPROVED” in the aris.properties file is set to "false” then, the highest version of the AER is imported as 'Unapproved' and the 'Last Approved' field is not set for this AER. However, the version that is just lower to that of the highest version of the AER will be set as 'Last Approved' and all the lower versions of the AERs will be marked as 'Approved'.
If the approval concept is set to 'Yes' and the property "IMPORT_AS_APPROVED” in the aris.properties file is set to "true” then, the imported AER will be marked as 'Approved' or 'Unapproved' depending on the data available in the Export File. If the AER being imported is the highest version and this version is approved in the Export File, then the field AER last approved is marked. Otherwise, the version of AER that is just lower to that of the highest version of the AER is marked as 'Last Approved'. All the lower versions of the AER are marked as 'Approved'.
Locking Version
You can lock an AER and make it unavailable for editing. This is usually done when you attempt to open the same AER that another user concurrently has opened.
ARISg also supports automatic locking of a case when an AER is submitted to a regulatory authority. A locked case can be opened in 'read-only’ mode and copied.
AER locking in ARISg can be classified as:
System locking
Database locking
System lockingcan be further classified as:
Manual locking - Open the AER and click CASE àLock to lock the AER manually.
This is possible if manual locking is enabled in the Installation Parameters (in ARISg Administrator) and you are given the privileges to lock AERs manually.Automatic/Algorithmic locking - The system can automatically lock the AER whenever it is submitted to any regulatory authority. Algorithmic locking of a case is done only if the following installation parameters are set:
When informed to any authority should be set to 'Yes’
When informed to <Some authority>
Note: When you open a version of a case for editing, all other versions are automatically locked. Other users can open the case in 'read-only’ mode but cannot update it at that time. The locks are released only when the first user closes the case.
When you open a case that is already opened by another user in an update mode, the user ID of the user who has opened the case is displayed in the 'Locked By’ field of the Main tab in Standard screen and General Administrative Data section of Main AER form.
When you open a Locked AER or previous version of AER, the attached documents in AER Literature forms are in "read-only” format. You can only view the document, but cannot modify (add/update/delete) them.
Database Locking occurs, whenever two users of ARISg try to open the same AER, the Oracle database automatically locks the AER from the second user.
When the installation parameter "Protect data using ownership concept”, is set to "Yes”, then:
A owner unit user can lock/unlock the case which is opened by the owner unit user or users from other units but a non-owner unit user cannot lock/unlock the same case. The Lock/Unlock option under the File menu is disabled for non-owner unit users.
If both owner unit user and non-owner unit user open the same case, then only the owner unit user can lock/unlock the case.
If a owner unit user opens a case, the case is locked algorithmically by informing the authority. The case is locked only upon saving the case.
A non-owner unit user can lock the case algorithmically only when no owner unit user is working on the same case. If the non-owner unit user tries to lock the case, a message, '”Another user has opened the AER for update, which is preventing the system to lock AER based on algorithm as set in installation parameter. AER will not be locked by algorithm this time.” is displayed.
When the installation parameter "Protect data using ownership concept”, is set to 'No’; the owner unit user can algorithmically lock a case, irrespective of the number of users working on the same case. A user associated with the owner unit also can lock the case by algorithm.
Unlocking a Case
You can unlock a locked AER, if the parameter Unlocking of locked AERs permitted is set to Yes in the Installation Parameters.
Open the AER
Click CASE > Unlock. This unlocks the AER and allows editing.
Note: A case cannot be unlocked if it is locked by another user.
Deleting an AER
On certain occasions, it is necessary to delete a case from within ARISg. AER Deletion actually consists of several features. For instance, you can choose to delete only the latest version of a case, or all versions.
You can fully delete the case from the database or a case can be "logically deleted". The case data still resides in the database, but cannot be accessed from any function of ARISg, except from the Undelete facility.
Any logically deleted case can later be 'undeleted’ using the Undelete facility. This restores any case/version, where it can again be accessed from the ARISg system.
When you delete a case logically, the communication records associated with the case appear in read only format.
when the case is restored, the communication records associated with the case gets converted into editable format.
When you delete a specific version of a case physically, the association between the communication records and that case version is removed.
Note: You must be very careful while deleting the data within the cases, since there is no way to get them back. Note that you can undelete an AER but not individual records. Also note that the records deleted are not reflected in the database unless you save the AER.
To revert all changes made to the AER during that session close the AER without saving.
The installation parameter 'Deletion permitted' must be set to either Yes or No to activate or deactivate the Delete option in the ARISg menu.
Depending on the owner unit set the configuration parameter Allow del/undel. of AERs to activate the delete option.
To delete AERs:
Select CASE à Delete, Deletion of AERs page appears. You can delete a case using this option when the AER is open.
Enter the AER information and describe the reason for deletion in the respective fields.
The information in the Deletion of AERs screen is described in the table below:
Field Name |
Description |
AER no. |
The AER number to be deleted. |
Version no. |
The version of AER to be deleted. |
Local version no |
The local version no of AER to be deleted. |
Mark AER as deleted |
Deletes the AER logically. |
Physically remove from database |
Deletes the AER from the database permanently. |
Delete this version |
Deletes the selected version of AER. |
Delete all versions |
Deletes all versions of AER. |
Reason code |
This field is associated with a drop down list box where you select the reason for deleting the AER. |
Reason description |
Description of the reason to delete the AER. |
Click Delete to delete an AER.
Note: When you mark an AER as logically deleted, the AER is available in the database and the user would be able to view the case. To display only the logically deleted AERs, select the Logically deleted AER option from the QBE.
Browsing Logically Deleted AERs
You can browse the logically deleted AERs using the QBE. However, for logically deleted cases no operation other than generation of reports is possible.
Select the appropriate option from the Special drop-down list in the Standard AER Selection (QBE) page:
Approved AER (Default)
Unapproved AER
Logically deleted AER
If you open a logically deleted AER, the documents in AER Literature are in read-only format. You can only view the document. You are not allowed to add/update/delete the document.
The application allows you to logically delete the approved cases and unapproved cases depending on the settings of the parameter Allow deletion of Approved cases and Allow deletion of Unapproved cases respectively.
NOTE: Logically deleted cases open in edit mode from Workflow Caselist page.
Browsing Logically Unlettered
When a deleted AER is opened, an 'Undelete AER’ option is available in the File menu. This option is available, if you have the privilege to undelete an AER. An AER can be undeleted only if that particular unit owns the case.
A logically deleted AER can be undeleted
by selecting File ![]() Undelete
option from the menu bar. The reason for deletion of the AER is stored
as a part of the AER table.
Undelete
option from the menu bar. The reason for deletion of the AER is stored
as a part of the AER table.
To undelete the logically deleted AER:
Click CASE à Undelete the following screen is displayed.
This screen is used to search for the logically deleted AERs based on the AER number or/and Date of Deletion.
Select the AER to be restored and click the Undelete button.
Enter the reason for undeleting the case in this page. The reason for undeletion of the AER is stored as a part of the AER table.
ARISg enforces the following constraints for undeletion of AERs:
The AER should be logically deleted. You cannot undelete an AER, which has been physically deleted from the database.
You should have the privilege to undelete cases.
If the parameter 'Allow deletion/undeletion of AERs only by owner unit’ is set to 'No’ then other units can undelete the case.
If the following installation parameters:
Protect data using ownership concept is set to 'Yes’
Use Local version scheme is set to 'Yes’
Allow del/Undel of AERs only by owner unit is set to 'Yes’
Create new version of AER on undelete is set to 'Yes’
Then,
A owner unit user can undelete a case and a new version of the case is created. A non owner unit user cannot undelete a case that belongs to other units. However a message 'Unable to Undelete the AER, since it belongs to different unit’ is displayed.
If the following installation parameters:
Protect data using ownership concept is set to 'Yes’
Use Local Version scheme is set to 'No’
Allow del/Undel of AERs only by Owner unit is set to 'No’
Create new version of AER on undelete is set to 'Yes’
A owner unit user can undelete a case and a new version of the case is created. A non owner unit user can undelete a case that belongs to other units. However a new version is not created but a message 'Creation of core version is allowed only for Owner unit’ is displayed.
If the installation parameter 'Create new version of AER on undelete’ is set to 'No’, then a new version of the undeleted case is not created.
If the installation parameter 'Protect data using ownership concept’ is set to 'No’, then a owner unit user or non owner unit user can undelete a case.
Validating Cases and Workflow
Validation facilitates you to perform data Validations to check the quality and correctness of the AER data entered in the application. Some Validations are performed on-line, while multiple cases are validated in batches.
Validations’ levels are of two types:
Case level – Before saving a case, the application checks if all the mandatory fields are entered or not. For incorrect entry, the application displays a validation message under Case validations section.
Workflow level – The failed validations are listed under Workflow validations section.
The Validate option is available in the File menu.
To view Validations page:
Create or Open the required case.
Click CASE > Validate.
The Validations page appears with case validation details.Double-click the validation message, the Description page is displayed where you can view the complete message.
Read the message and click OK to close the Description page.
Or
- Select the Validation message and hover the mouse pointer over it to view the complete description of the message in the Tooltip.
Click Print to take the printout of validation messages.
For more information on Validation, refer the Maintaining Validations section in the Customization guide.
Reporting Decision
An AER is assessed depending on the data entered in it. When all the assessments have been performed, a decision must be made whether a case should be reported to an authority, and under what circumstances. The user who identifies which authority receives what report may enter reporting Information.
Updating Batch for Informed Authorities outside the Case
ARISg allows you to update the Informed Authority data without having to open the AER.
To updated Multiple AERs at a time From the List of Selected AERs page:
Select one or more cases and click Others à Authorities. The Batch Updating Informed Authority page appears. with the informed authority records can be updated for the selected cases.
You can perform the following functionality:
Functionality |
Description |
Add |
You can enter a new record by clicking New button. A new record is added at the end of all the records. When a new Record is added, the Authority column displays the name of the Authority selected in the Preferences page. |
Save |
To save the new record(s) you added or to save any modifications you made to existing record(s). ARISg displays a message 'Records saved successfully’ after the modifications are saved. |
Delete |
You can delete a record by clicking Delete button. When there are multiple records, the one with the cursor in it is deleted. |
Close |
Closes the Batch updating Informed Authorities page. |
New AER |
To choose an AER and add records to that AER. A page is displayed when you click this button, which allows the user to enter AER numbers. Enter an AER number for which the records are to be added. This record is appended at the end of the records with the Authority column displaying the name of the Authority selected in the Preferences page. |
Help |
Help button invokes the context sensitive on-line Help. |
The system automatically creates a workflow process for all the cases that undergo a change with respect to informed authority data, to facilitate automatic transmission of cases (Authority data updates) to all required affiliates when Authority data is changed.
When an Informed Authority record is created / updated, the version of the case for which the Informed Authority record is created / updated is inserted into the workflow process defined in the workflow parameter, "When IA updated outside workflow”.
For PSUR/DSUR/ASR reports, the Product selected in the report selection criteria of the report is printed in the AER number file when:
the parameter Consider selection criteria product in the AER number file is set to Yes in the Admin > Parameters > Installation Parameters > Reports tab page.
the product is selected and the Authority is not selected in the report selection criteria page of the Report.
Generating Report Features
The following features are provided for generating reports in ARISg.
Printing, Faxing, and Storing the Report
In ARISg, you can print the reports to either a file or a printer. ARISg uses the standard Pages printer setup - the reports in the system can be printed to any printer supported via Pages. You can also print to file for historical records.
When used in conjunction with Micros oft Fax (provided with Pages 95 and NT 4.0), you can fax any ARISg generated report from ARISg to any fax machine.
The generated report is displayed in the .pdf format in Adobe Acrobat application. Click the Print icon from the tool bar or click CASE à Print from the menu bar of the Adobe Acrobat application to print the reports.
Drafting Reports
ARISg includes a 'Draft’ feature that allows you to print reports with a 'DRAFT’ watermark, to avoid confusion between these reports and the final reports for submission.
Since security restrictions apply to this feature, any user can be restricted to only DRAFT output. Only authorized users can generate final reports.
Flexibility
Parameters allow you to customize the system to meet your company’s needs. The system generates reports based on the parameters you set.
It is possible to include/exclude data, change the format of the data and use different logic to generate any report thus satisfying the authority requirements and the reporting company.
These parameters do not require coding; they are available through the same GUI used for data entry. Most parameters are set globally. However, many reports also support run-time parameters. Run time parameters are set when the report is generated.
Generating Report Options
ARISg supports report generation of the following types:
Online generation
Background generation using the Report Server
This can be set under Tools à Option à Preferences à Reports in ARISg Main Menu.
Online Generation of Report
To generate the reports online:
Select Tools à Options à Preferences à Reports in ARISg Main Menu.
In the field 'Report Generation Type’, select the radio button 'Online’
The report generated online can be viewed immediately.
Background Generation of Report
You can generate the reports in background mode as well. This means, while the report is being generated, you can continue working with the system after submitting the report. The report can be generated either on the same system that you are working or on a separate system.
To generate reports in the background:
Select Tools à Options à Preferences à Reports tab from the menu bar.
Set the 'Report generation type’ to 'Report Server’.
Note: When a case is open, even though the report generation option is set to 'Report Server’’ the report will be generated online.
Click Save button to save the changes, click Close to the Reports page
Generating Run Time Reports
Click Tools à Options à Run time reports from the menu bar the Run Time Reports page appears.
The fields on the page are described below.
Field |
Description |
Job option |
Specifies the report generation options. The possible values are:
Note: The report server has to be up and running for the reports to be generated through the Report Server. |
Run time |
Specifies the type of report generation. The options are:
|
Delayed Execution |
Specifies whether the report has to be generated after a time delay. Select Yes, Schedule time after option to delay the generation of reports. The report generation scheduled time can be set maximum up to 99 days/hours/minutes. The Report Server will generate the report after the scheduled time has expired. The Delayed Execution field is set to No by default. Note: This option is enabled only if the field Job Option is set to Report Server. The Scheduled time after is relevant only if the 'Report generation type’ is set to 'Background’ in the user preferences and the Delayed Execution field is set to Yes. If no data is entered in Scheduled time after field, ARISg displays the message 'Please enter value and unit for delayed execution scheduled time'. |
Priority |
Enter the priority for the generation of report. |
Data |
The following option, to specify the data as Private or Public. Select:
Note: Even if an unprivileged user selects the Public option, the private fields in the report will not be available for viewing. You may select both to view the Private and Public data in the reports. |
Select the Run Time Report fields.
Click OK to set the Run Time Report, click Cancel to clear the fields.
Background Report Queue
In ARISg, you have an option to update multiple AERs with Informed Authorities data in a batch process. When you perform batch update of IA data, the application automatically updates all the AERs selected with the IA information.
When you are updating multiple AERs with Informed Authorities data in a batch process, the status of the batch update details are displayed in the tabular format under Background Report Queue tab in the Queue Status dialog box.
The Background Report Queue tab is enabled only when either Batch update of informed authorities of data and Batch unblinding parameters are enabled in ADMIN.
The User with privilege to access Batch Update of Informed authorities and Batch Unblind is allowed to view both Batch Update of IA data and Batch Unblind process requests in the Background Report Queue tab.
For logged in user having access only to Batch Unblind, the Background Report Queue tab displays only the Batch Unblind process request submitted by the current login user and the Batch Unblind process request submitted by other Users, vice-versa for the user with only the Batch Update of IA data access privilege.
In this batch process, the application search and verify whether the AER is associated with the Authority and the Report format selected in the Batch update of Informed Data dialog box of CASE > Batch update of informed authorities. If the parameters matches, the Date informed value is updated for that AER.
If the Authority does not match, then the application creates and updates the AER with the Authority selected in the Batch update of Informed Data and updates the Date informed value accordingly for that AER.
There are three types of completion status the application displays on batch updates completion:
SUCCESS - Indicates all the AERs are successfully updated with IA data.
FAILURE - Indicates some or all the AERs are not updated with the IA data due to specific reason. For example, the AER local version may not exist i.e., when you attempt to batch update the AERs using the aerlog.dat file saved from other database.
ERROR - Indicates error in batch update.
QUEUED - Indicates the new batch in queue submitted for Batch processing.
The batch update Submitted date and Completion date is displayed for batch update SUCCESS and FAILURE. However, the Completion date is not displayed for a batch update resulting in an ERROR.
Based on the following user privilege conditions the information about Batch Update of IA data and Batch Unblind is displayed:
If the user have access to batch unblinding, then, only the batch unblinding information is displayed, and batch update of IA information is not displayed, and vice-versa.
The current login user can view the batch update information initiated by other user in the Batch Report Queue tab.
To view the Background Report Queue of a Batch update of Informed Authorities data.
Login to ARISg application.
Click the QBE icon on the upper right of the screen.
The List of Selected AERs window appears.
Select the AERs for which you want to update with the IA data.
Click Save.
The Save AER List page appears.
Click Save to File.
The File Download dialog box appears.
Click Save.
The Save as dialog box appears.
Browse to the location where you want to save the aerlog.dat file.
Click Save.
From the CASE menu, click Batch update of informed authorities data.
The Batch Update of Informed Authorities Data dialog box appears.
From the Authority list, select the Authority.
From the Report Format list, select the report format type.
In the Date informed box, enter the date you sent the case(s) to the authority.
In the File with AER numbers box, click Browse.
The Choose File dialog box appears.
Browse to the location where you have saved the aerlog.dat file.
Click Open to add the aerlog.dat file.
Click OK.
The Batch Update of IA or Batch Unblinding process is initiated and to view the batch update details, perform the following:
From the Tools menu, point to Options and then click Queue Status.
The Queue Status dialog box appears.
Click the Background Report Queue tab.
The Background Server Queue appears displaying the list of Batch updates that are in progress.
Field |
Description |
Request ID |
The ID of the request submitted to the Server. |
Operation Type |
The batch update type in progress.
|
Identifier |
Classifying the batch update type based on the Authority or Protocol/Project Number.
|
Status |
The status of the batch update:
|
Submitted date |
The date and time when the batch update was submitted. |
Completion date |
The date and time of completion of the batch update. NOTE: The Completion date is not displayed for the batch update process in QUEUED status. |
Open |
To view the information about the batch update status. NOTE: You are allowed to open and view only the SUCCESS and FAILURE batch update status information. |
Delete |
To delete a batch update. You can delete only the SUCCESS, FAILURE or ERROR batch update status. The QUEUED batch update status is not allowed to delete and displays the message "Job is in process. Can not be deleted” on attempting to delete the QUEUED batch update status. |
Refresh |
To refresh the Batch Server Queue. |
Close |
To close the Queue Status dialog box. |
NOTE: When the Reporting Status codelist (Codelist ID 45) in ADMIN is modified, the Application Server must be restarted to consider the codelist changes in Background batch update process.”.
Secondary DB Queue Status
When a Secondary DB has been setup as the backup for the ARISg Primary DB, you can initiate background generation of the Line Listing Reports in the Report Server using the Secondary database. In ARISg, you can schedule the generation of multiple LL reports. The application sends these scheduled report generation tasks to the server in a queue. The Report Server generates these reports according to their priority and scheduled time.
In this tab, the application displays all the details of the scheduled background reports in a tabular format. You can view the status of each report generation.
To view the Secondary DB Queue Status.
- Select Tools > Options > Queue Status.
The application display Queue Status dialog box.
- Click the Secondary DB Queue Status tab.
All the background reports available in the Report Server queue for generation are displayed in a tabular format.
The fields displayed in the page are explained in the following table:
Field |
Description |
Request ID |
The ID of the request submitted to the Report Server. |
Module ID |
The name of the report module that is in the Queue for generation. |
Scheduled Date |
The date and time of which the background report is due to be generated. |
Status |
The status of the generation of the report:
|
Submitted date |
The date and time when the report was submitted to the report server for generation. |
Completion date |
The date and time when the report was generated. |
Open |
Open and view the Report in the PDF format. |
Delete |
To delete queue entries request ID (s) (with report status as pending and generated). |
Refresh |
To refresh the tab to view the latest addition to the queue. |
- Click Close to close the Secondary DB Queue Status page.
Working with Literature Library
Associating AERs
To Associate AERs, select one or more literature library records from the "List of selected Literature library records” page and click "Associate AERs” button.
When you associate the AERs with the literature record the associated literature information is updated in the AER literature information page.
Associating AERs to Literature Library Records
You can associate one or more AERs to literature library records. To Associate AERs to literature library records following steps are involved:
Invoke the AER QBE.
Enter search criteria and click 'search’.
From the List of selected AERs, select one or more AERs and click Associate LLR button.
Standard literature library QBE page is displayed, enter the search criteria.
From the List of Selected LLRs screen, select one or more literature records and then click Associate AERs button.
The system will display the selected AERs and literature library records as shown in the below page.
Select one or more AERs and LLRs to be associated and click 'Associate’ button. The literature record to be associated is displayed in List of associated AERs and LLRs on bottom of the existing screen.
Select the literature records to be associated and click 'Save’ button.
When you click the Associate button status will display AER literature record will be created.
When you click the Save button from the List of associated AERs and LLRs, the appropriate save message is displayed.
The attached documents of the LLR are also copied to the associated AER.
Following status is displayed in the status column:
AER literature will be created or updated.
AER literature has been created or updated.
Following buttons are provided in the "Associate AERs to Literature library” screen.
Field |
Description |
Associate |
Associates the selected AERs and LLRs. |
Close |
Closes the Associate screen and displays the LLR screen. |
Remove |
Removes the AERs and LLRs to be associated. |
Save |
Saves or updates the literature record in AER. |
Cancel |
Cancels the association of AERs and LLRs. |
Note:
(a) At least one combination of AER(s) and LLR(s) has to be selected for association.
(b) You cannot associate AER(s) that are locked, deleted logically or Previous version of AER(s).
(c) To perform Association you need to have Associating privileges.
Associating the Literature with AER
Single Literature associated with AER :
The single Literature is associated with an AER and if date requested in the literature library evaluation tab is available, then this "date requested” in the evaluation tab screen is copied to the latest received date of the AER.
The latest Assessment date is copied only when there are multiple Assessment records. If assessment records are not available then latest received date in the Receive Info screen will be copied to latest received date in AER.
Multiple Literatures associated with one or multiple AERs:
The multiple literatures comprise of assessment details, then the latest date requested of all the assessment details is copied into latest received date of the AER.
If there are no assessment details in any of the literatures, then latest received date is copied to latest received date in AER.
Associating Literature Library Records to AERs
You can associate one or more Literature library records to AERs. To Associate literature library to AERs records following steps are involved:
Open the Literature QBE.
Enter search criteria and click 'search’.
From the List of selected LLRs, select one or more Literature records and click 'Associate AER’ button.
AER QBE page is displayed, enter the search criteria.
From the "List of selected AERs” screen, select one or more AERs and click 'Associate LLRs’ button.
The system displays the selected AERs and literature library records to be associated.
Select one or more AERs and LLRs to be associated and click 'Associate’ button. The literature record to be associated is displayed in "List of associated AERs and LLRs” at the bottom of the existing page. Select the literature records to be associated and click Save button.
The attached documents of the LLR are also copied to the associated AER.
Note: At least one combination of AERs and LLRs has to selected for association
You cannot associate AERs that are locked, deleted logically or previous version of AERs. To perform Association you need to have Associating privileges.
Generating Audit Trail
The Audit trail facility helps you maintain a trail of all field level changes done to a case. You can activate the audit trail by setting the audit trail parameters based on your requirements. AER data and Codelists can be audited. No data related to dictionaries can be audited.
The AER data is audited in terms of sessions. Each database commit (each time you save a case) is considered a session and is identified by a unique session ID. By the end of a session, you can update a single record or update an AER where you have modified a large number of fields.
The system audits all changes made to the fields. This includes:
Change of value in any fields
Addition of new records
Deletion of existing records
Note: The RECORD_ID from the AER tables is copied to RECORD_ID field of SYSTEM_AUDIT_TRAIL thereby saving time on generation of new record ID by the system.
To modify the value of a field, if the audit trail parameter Reason for changes is enabled:
The system displays the Audit Trail session page when you save the case.
In the Audit Trail Session page enter a single reason for all the changes made in one session.
A brief description of the Audit Trail Session page is given below:
Field Name |
Description |
AER no. |
Displays the AER number for which the audit trail is done. |
Version no. |
Displays the version number of the AER for which the audit trail is done. |
Session ID |
Displays the session ID for which the audit trail is done. |
Reason code |
The reason for modifying the value in the fields. |
Reason description |
Description of the reason for modifying the value in the field. |
Click the Details button to view the details of the changes made. The Audit Trail Session page appears.
In the Audit Trail Detail section, enter a reason and description for each field modified.
Field Name |
Description |
Field name |
Displays the name of the field which is modified. |
Old value |
The previous value of the modified field. |
New value |
The new value of the modified field. |
Reason code |
The reason for modifying the value in the fields. |
Reason description |
Description of the reason for modifying the value in the field. |
Column resize and sorting in EBA grid |
Resizes the columns in the EBA grid by dynamically moving the mouse and provides the arrow to sort the columns in the ascending order or descending order. |
Click the OK button to save the details and close the page.
Note:
If you do not have privileges for data privacy and you open the case,
then the application displays the character '![]() ’
in the privacy fields. In addition, if you delete the privacy data
related records from the data entry screen and save the case, then
the Audit Trail Details window displays the text "Privacy” in
the Old value column.
’
in the privacy fields. In addition, if you delete the privacy data
related records from the data entry screen and save the case, then
the Audit Trail Details window displays the text "Privacy” in
the Old value column.
Limitations of Audit Trail
The system does not audit the following data (entered or modified):
The AER data is imported into the ARISg database using the ARIS Import utility.
Note: All data modified through automatic calculations or autocoding is audited.